


Photo by Jenn Simpson on Unsplash
Upgrading Systems: Transitioning Legacy Data to a New System
Using Oracle Forms migration to Oracle APEX as an example


Table of contents
Context:
When solutions require significant overhauls or upgrades to align with organizational needs, foster competitive differentiation, or transition to cutting-edge technology while maintaining the current system's operations, the tasks of creating an automated data migration process to the new system, developing the new solution, conducting tests, and transitioning to production can be quite daunting. A prime example is an Oracle Forms migration, where the organization seizes the opportunity not only to update the technology but also to reimagine how the system can be redesigned to substantially increase its value. This echoes the sentiment of a CIO I once worked for who said, "Don't just put lipstick on the pig..."
Processes that migrate legacy data from one system to another are crucial during development, testing, and production phases until the legacy system is decommissioned after the final cutover. These migration processes differ from those that address the continuous data integration needs of interdependent systems, which often involve real-time transactions and data queries. For instance, an APEX e-commerce application may use APIs to process payments through services like Stripe. Jon Dixon does a nice job covering the data requirements for ongoing system needs in his recent blog post How to fetch data from remote systems over REST using APEX, ORDS & DB (cloudnueva.com). Similarly, while there are purchasable software solutions that cater to data migration needs, their costs may not always align with the project's scale or the organization's budget.
Objective:
Develop a framework for transitioning legacy data to a new system that encompasses design, maintaining the legacy system's operations, construction, testing, and migration. The focus should be on managing data throughout the transition, rather than the complete migration process from Oracle Forms to Oracle APEX, which warrants several detailed blog posts.
Details:
Legacy system continues to operate as usual.
Create Extract, Transform, and Load (ETL) processes that make legacy data accessible in the new APEX environment without disrupting the legacy system.
Create automated ETL processes for migrating data to the newly designed database schema that can be scheduled or run ad hoc.
Automate reconciliation and testing of migrated data compared to legacy data.
Notes:
- Migrating historical data can be a complex endeavor. It's crucial to carefully evaluate the volume and variety of historical data necessary for the new system. Data beyond a specific age and category may not be essential, as there are legal advantages to both retaining and deleting records based on their age. Alternatively, archiving or maintaining the Forms system solely for retrieval purposes could be considered.
Benefits:
Opportunity to entirely rethink the solution to better align with current organization objectives, competitive landscape, value proposition, and greatly expanded technological capabilities, especially as compared to when Oracle Forms solutions were created.
APEX application user interface that documents the relationship between legacy data, Extract Transform Load (ETL) processes, and new system target tables; supports management of the ETL processes that is data driven; reconciles and traces legacy data to data in the new system; and logs ETL results with check totals and values.
Create a layer of physical or logical data encapsulation the development and test life cycle stages can use that makes legacy data fully available while minimizing impact on the legacy dev, test, and prod environments.
Make it easy to execute ETL processes individually, as a group (e.g. order data only), or in their entirety on an ad hoc, or scheduled basis using APEX Automations.
Create a data resource when investigating the source of new data items, or confirming legacy data was properly integrated into the new system.
Solution:
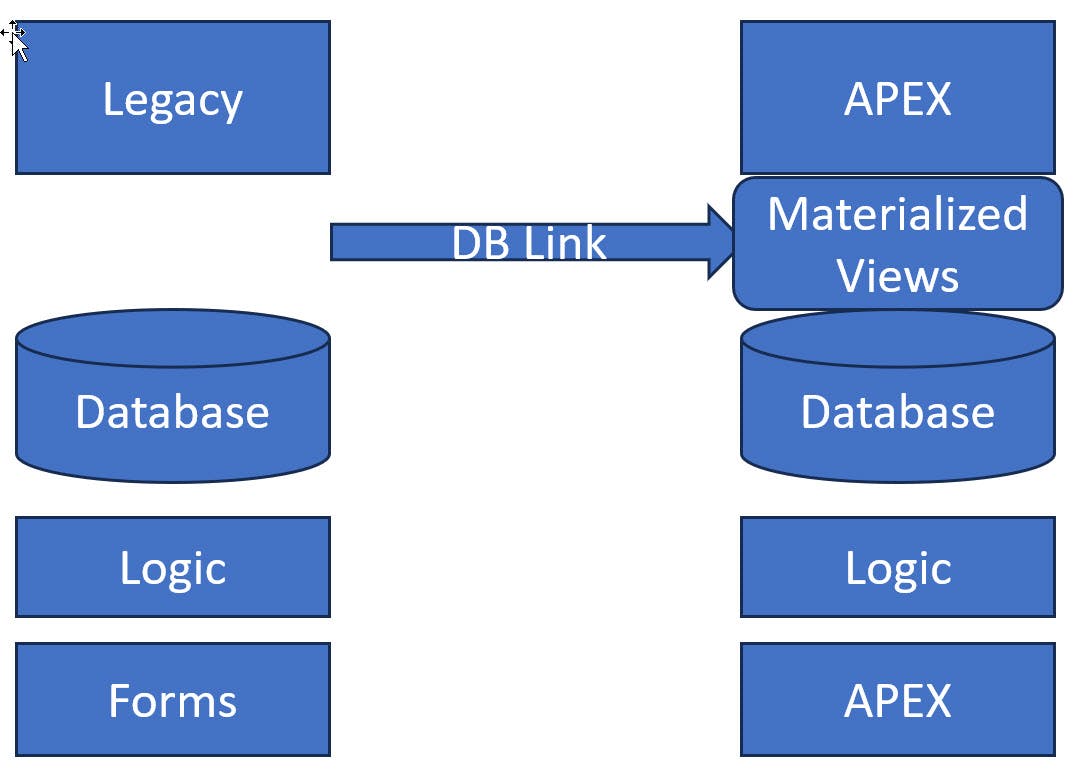
Make legacy data accessible in the new system as it appears in the legacy system.
Legacy data accessibility in the new system is needed to create automated ETL that will migrate and map the legacy data to the new system with an updated database design. Make it easy to schedule refreshes and update at will. Once the system is cutover these ETL processes will no longer be needed.
Access Channel: Establish a communication channel between the legacy and new environment that will allow data access and transfer. The easiest method is likely a database link.
Materialized Views: These views, which replicate each legacy table, can be refreshed on demand through the database link. This process makes the legacy Forms data accessible in the new APEX environment. During development and testing phases, having "fresh" data is not usually essential, allowing for ad hoc refreshes of the materialized views. There are performance advantages to pulling data only when necessary for a refresh, rather than at every instance of use. This method does not impact the legacy Forms environment with each data retrieval. Moreover, there must be adequate storage space to accommodate both the legacy data in the Materialized Views and the data newly migrated to APEX.
Non-Materialized Views: In the APEX environment, non-materialized views replicate legacy tables via a database link, exemplified by 'Select * from Customers@db_forms_link'. Data access can influence performance in both Forms and APEX environments, contingent on available resources, link speed, and the volume of data. Nevertheless, they do not consume space within the APEX environment and are might not substantially affect the Forms environment if initially attached to the Forms development or testing environment, or an environment with replicated data such as an operational data store.
Hybrid: Depending on the factors above some views may be materialized or non-materialized.
Transform legacy data into new database design.
Create ETL PL/SQL packages to transform legacy data into new design. Functionality should include deletion of new data to support a full replace, addition of new data and updating of existing (i.e. add new customers, update existing customers), ordering of ETL according to interdependencies (i.e. can't add customer orders before adding customers), categorization of data for group operations (i.e. update all sales data), logging, and reconciliation of new to old data verifying load integrity.
Note:
- ETL processes that include quality reconciliation and testing, along with the development of a new system based on an updated database design, will inevitably uncover legacy data integrity issues. The primary focus should be on resolving the data quality issues within the legacy Forms system, which is the source, allowing the corrected data to propagate to the new system and maintain synchronization. Altering data during the ETL process should only be considered as a final option if rectifying the source is impractical.
User and administrator insight.
Create APEX page(s) to view legacy data, manage ETL, and review reconciliation and logging results.
Process:
Make legacy data accessible in the new system as it appears in the legacy system. After creating database link between legacy forms DB and APEX DB (LNK_PROD for example), create scripts defining (materialized) views in APEX mirroring the tables in legacy forms DB.
Example script to create a script that will build the materialized views:
      Set Echo Off;
      SET PAGESIZE 0
      SET LINESIZE 1000
      SET ECHO OFF
      set Feedback off;

      Spool c:\LegacyProject\Scripts\Create_Legacy_Mat_Views.sql;

      with t_objects as (
        Select Distinct owner, object_name
         From DBA_Objects
         Where Object_Type='TABLE'
         And OWner='LEGACY_SCHEMA'
         Order by Object_name)
      Select 'Create Materialized View LEGACY_SCHEMA.VW_VM_' || t_Objects.Object_Name ||
             '  As Select * From LEGACY_SCHEMA.' || t_Objects.Object_Name || ';'
        From t_Objects;

      Spool off;

      Set Echo On;
      Set Feedback On;
      Set Echo On;
      SET PAGESIZE 20
      SET LINESIZE 1000
Create a multi-tab APEX page for managing views, ETL load control, reconciliation, and viewing legacy data.
"Legacy Materialized Views" tab:

Inventory of Legacy (Materialized) Views and an option to "Refresh Selected Materialized Views" under the "Actions Menu".
The View IG SQL Query Source is below with reference to an ETL Load Control Table described further on in this post.:
      --
      --APEX "Legacy Materialized Views" tab SQL Query Source:
      --
      select * from VW_LGY_MViews
      Where Owner = 'LEGACY_SCHEMA';

      -- VW_LGY_MViews script:
      Create Or Replace View VW_LGY_MViews
          As
          Select
               All_MViews.Owner
              ,All_MViews.Mview_Name
              ,ETL_LGY_Load_Control.ET_LOAD_GROUP_CID
              ,ETL_LGY_Load_Control.ET_LOAD_PROCESS_CID
              ,ETL_LGY_Load_Control.ET_RUN_ORDER
              ,All_MViews.Container_name
              ,All_MViews.Query
              ,All_MViews.Query_LEN
              ,All_MViews.Updatable
              -- Add other ALL_MViews columns not shown here for brevity
              From
              All_MViews
              ,ETL_L55_Load_Control
          Where
              All_MViews.MView_Name = ETL_L55_Load_Control.ET_L55_Table_name (+)
In the Actions Menu, add a choice to "Refresh Selected Materialized Views" that calls:
       BEGIN
          v_Delimiter     := ':';
          -- P38_MVIEW_NAME_CURR contains : delimited string of currently selected IG row's primary keys'
          -- Option for populating selected keys: https://github.com/ainielse/get_ig_data

          v_Array         := apex_string.split(:P38_MVIEW_NAME_CURR, v_Delimiter);
          FOR i IN 1 .. v_Array.count
            LOOP
              v_Section   := '40:';
              DBMS_MVIEW.Refresh(v_Array(i));
           END LOOP;
        END;
Transform legacy data into new database design.
Create Load Control table for tracking and managing ETL procedures, relating legacy to new table, group common types, i.e. Codes, Customers, Employees, etc., switches for loading, overwriting, deleting, and automating, identification of load process, and run order to account for data interdependencies:
      Create Table ETL_L55_Load_Control(
      ETL_LGY_Load_Control_ID NUMBER(20)               Unique ID of this control entry.
      ET_LGY_TABLE_NAME       Varchar2(128 CHAR) Name of legacy table being controlled.
      ET_NEW_TABLE_NAME       Varchar2(128 CHAR) Corresponding name of the table in new APEX system.
      ET_LOAD_GROUP           Number(20)         Load commands grouped together as a way to select them for batch processing.
      ET_LOAD_YN              Varchar2(1 CHAR)   Include Overwrite option?
      ET_DELETE_YN            Varchar2(1 CHAR)   Include Delete option?
      ET_DELETE_LOAD_YN       Varchar2(1 CHAR)   Include both Overwrite and Delete option?
      ET_AUTO_JOB_YN          Varchar2(1 CHAR)   Include in APEX automation jobs?
      ET_LOAD_PROCESS         NUMBER(20)         Process abbreviation used to determine which code to run.
      ET_RUN_ORDER            NUMBER(20)         Order in which the commands should be run
      ET_EFFECTIVE            DATE               Date this entry became valid.
      ET_EXPIRES              DATE               Date on which this entry is no longer active.
      )
"Load Control" tab:

Inventory of ETL jobs and processes to load and delete by group, or at a row level run selected job reflecting overwrite and delete options chosen. The IG SQL Query source is:
      select ETL_LGY_LOAD_CONTROL_ID,
             ET_LGY_TABLE_NAME,
             -- SY_TABLE_ROW_COUNT is f() that returns # of rows in table/view
             SY_TABLE_ROW_COUNT(p_Table_Name=>ET_LGY_TABLE_NAME) LGY_ROW_COUNT,
             ET_NEW_TABLE_NAME,
             SY_TABLE_ROW_COUNT(p_Table_Name=>ET_NEW_TABLE_NAME) NEW_ROW_COUNT,
             ET_LOAD_GROUP,
             ET_LOAD_YN,
             ET_DELETE_YN,
             ET_DELETE_LOAD_YN,
             ET_AUTO_JOB_YN,
             ET_LOAD_PROCESS,
             ET_RUN_ORDER,
             ET_EFFECTIVE,
             ET_EXPIRES,
             Case
             When Trunc(Current_Date) Between ET_Effective and ET_Expires Then
               'ACTIVE'
             Else
               'INACTIVE'
             End                  STATUS_CONTROL,
             Case
             When Trunc(Current_Date) Between ET_Effective and ET_Expires Then
               'GREEN'
             Else
               'RED'
             End                   STATUS_COLOR_CONTROL,
             SY_USER_ID_ADD,
             SY_DATE_ADD,
             SY_USER_ID_MOD,
             SY_DATE_MOD
        from ETL_LGY_LOAD_CONTROL
"Available Load Groups to Import" is a distinct list of Load Control groups in ETL_LGY_LOAD_CONTROL.
Actions Menu choices include Load and Delete the group selected from the list. Create a single package with a main procedure that assigns a batch # and accepts the Load Group and related parameters that in turn calls the appropriate procedure for the given group based on the group entries in the ETL_LGY_LOAD_CONTROL table. ("Run" code not provided because will be different in each project for each data source.)
Pkg_ETL_LGY_Load_Control.Run_Load_Group( p_Load_Group          => :P38_LOAD_GROUP
                                        ,p_Error_On_No_Find      => 'Y'
                                        ,p_Force_Delete_YN    => 'N'
                                        ,p_Force_OverWrite_YN => 'Y');
-- Loops through ETL Load Control table for selected group rows calling
-- Selected Process for each group.
Pkg_ETL_L55_Data.Run_Selected_Process( p_ETL_L55_Load_Control_ID     => c_Control.ETL_L55_Load_Control_ID
                                     ,p_BA_Number                    => v_BA_Number
                                     ,p_Force_Delete_YN                => v_Force_Delete_YN
                                     ,p_Force_OverWrite_YN            => v_Force_OverWrite_YN);
The row menu has a choice for running a specific row that directly calls Run_Selected_Process shown above.
The IG is updateable allowing management of the individual entries.
Run Order sequences all jobs into an order that takes into consideration data interdependencies. For example, customers would occur before customer orders.
Source and target table name and counts assist with determining the current state of the data.
Load Process names the ETL process associated with the row.
"Load Control Batch Logs" tab:

Batch log entries for each ETL_LGY_LOAD_CONTROL process executed with before and after check counts created by the load process of a given row. In addition, the EL...NAME, B, and A columns allow flexibility in use depending on the nature of the data. For example one load might have before (B) and after (A) purchase order counts (NAME), another might be before (B) and after (A) salary totals (NAME). When deleting and reloading data with keys based on sequences it may be advisable to reset sequence numbers to starting values. The Batch log sequence columns can assist with this. The purpose of the check columns is to automate and assist with legacy to new data reconciliation as much as possible.
      ETL_LGY_Load_Log_ID       NUMBER(20)               Uniquely identifies this ETL_LGY_Load_Log.  Use Current Date between effective/expires to get current entry.
      ETL_LGY_Load_Control_ID   NUMBER(20)               Uniquely identifies related Load control row containing info on ETL run for this entry
      EL_BA_NUMBER              Varchar2(40 CHAR)     Batch of ETL commands run together resulting in this and other rows.
      EL_LGY_COUNT_BEFORE       Number(20)         Number of rows in legacy table before ETL run
      EL_LGY_COUNT_AFTER        Number(20)         Number of rows in legacy table after ETL run
      EL_NEW_TABLE_NAME         Varchar2(128 CHAR) Name of target table receiving loaded information
      EL_NEW_COUNT_BEFORE       Number(20)         Number of rows in new table before ETL run
      EL_NEW_COUNT_AFTER        Number(20)         Number of rows in new table after ETL run
      EL_TABLE_NAME             Varchar2(128 CHAR) Name of table counts on this log row are referencing
      EL_COUNT_BEFORE           Number(20)         Number of rows in table before ETL
      EL_COUNT_AFTER            Number(20)         Number of rows in table after ETL run
      EL_SEQ_MAX                Number(20)         Maximum primary key value after ETL run
      EL_SEQ_NEXT               Number(20)         Next sequence number of primary key
      EL_MISMATCHES             Number(20)         Number of mismatches
      EL_NUMBER_01_NAME         Varchar2(128 CHAR) Name of Number value 1
      EL_NUMBER_01_B            Number(20)         Number value 1 Before updates
      EL_NUMBER_01_A            Number(20)         Number value 1 after updates
      EL_NUMBER_02_NAME         Varchar2(128 CHAR) Name of number value 2
      EL_NUMBER_02_B            Number(20)         Number value 2 before updates
      EL_NUMBER_02_A            Number(20)         Number value 2 after updates
      EL_NUMBER_03_NAME         Varchar2(128 CHAR) Name of number value 3
      EL_NUMBER_03_B            Number(20)         Number value 3 before updates
      EL_NUMBER_03_A            Number(20)         Number value 3 after updates
      EL_EFFECTIVE              DATE                     Date this entry was made
      EL_EXPIRES                DATE                     Date this entry is no longer valid
"Reconciliation Views" tab:
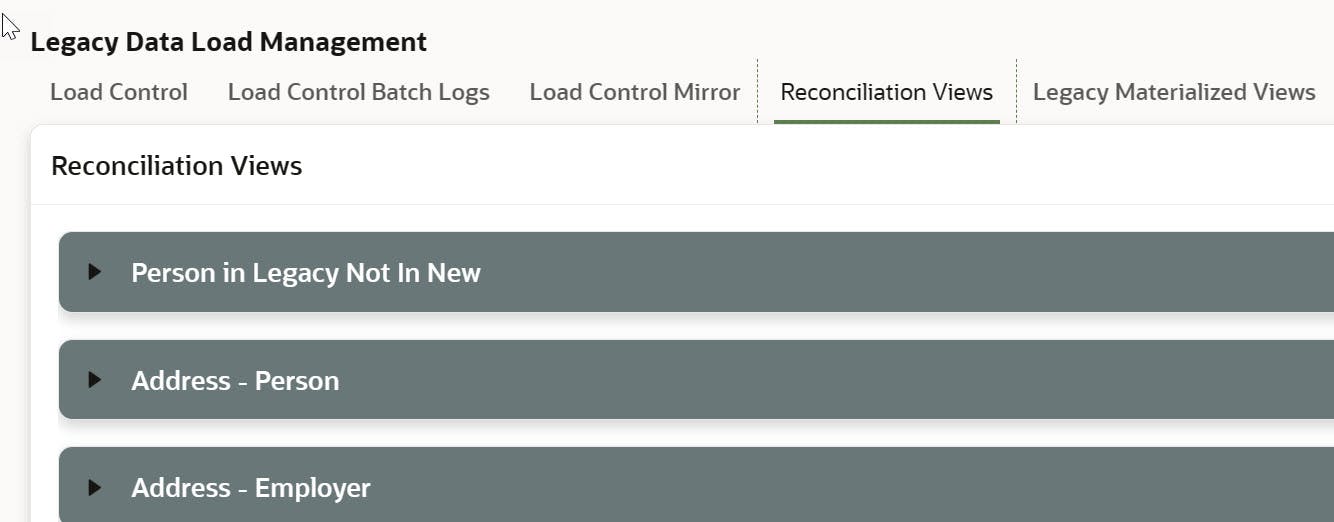
Multiple IG collapsible regions with lazy loading whose sources are reconciliation views designed to identify anomalies and trace legacy to new data. Regions are collapsible with lazy loading to make selection easier and minimize load time, especially for IGs that will not be viewed in the current session.
Reconciliation Views serve as a tool to automate the comparison of Legacy and New data. The fundamental idea is to create views that select everything from the legacy (materialized) view and the new tables (subject to changes in database design), where legacy_ID equals New_ID (+), ensuring all Legacy rows are displayed. Case statements can evaluate exception conditions, and various filters can be applied, which are then saved as distinct IG Public Reports in the Actions Menu. An example of an Address data reconciliation view script is provided, which compares legacy to new address columns, utilizing case statements to identify mismatches in person or email. These discrepancies can be filtered for review, for instance, by using Status_Person_Match='PERSON MISMATCH' and then saved as a Public Report titled "Addresses matched to a different person".
Reconciliation views can be used during testing or when researching anomalies to trace legacy entries to new entries, and vice versa.
      Create Or Replace View VW_LGY_REC_Address
      As
      Select
       Address.ADDRESS_ID
      ,Address.AD_Owner_ID
      ,VW_LGY_Address.PersonNum
      ,Pkg_Person.LGY_ID_To_New_ID(    p_PE_LGY_PersonNum    => VW_LGY_Address.PersonNum)   Person_ID_Assigned_At_Import
      ,Case
       When Pkg_Person.LGY_ID_To_New_ID(    p_PE_LGY_PersonNum    => VW_LGY_Address.PersonNum) <> Address.AD_Owner_ID Then
        'PERSON MISMATCH'
       Else
        'MATCHED'
       End                         Status_Person_Match
       ,Case
        When Pkg_Person.LGY_ID_To_New_ID(    p_PE_LGY_PersonNum    => VW_LGY_Address.PersonNum) <> Address.AD_Owner_ID Then
         'RED'
        Else
         'GREEN'
        End                          Status_Color_Person_Match
       ,Address.AD_EMAIL
       ,VW_LGY_Address.EMAIL
       ,Case
        When Trim(Upper(Address.AD_EMAIL)) <> Trim(Upper(VW_LGY_Address.EMAIL)) Then
           'MISMATCH EMAIL'
        Else
         'MATCHED'
        End                         Status_EMAIL_Match
       ,Case
        When Trim(Upper(Address.AD_EMAIL)) <> Trim(Upper(VW_LGY_Address.EMAIL)) Then
           'RED'
        Else
         'GREEN'
       End                         Status_COLOR_EMAIL_Match
       ,Address.LGY_ADDRESS_ID
       ,Address.AD_ADR1
       ,Address.AD_ADR2
       ,Address.AD_CITY
       ,Address.AD_STATE_PROVINCE_CID
       ,VW_LGY_Address.ADDRESSSEQNUM
       ,VW_LGY_Address.ADR1
       ,VW_LGY_Address.ADR2
       ,VW_LGY_Address.CITY
       ,VW_LGY_Address.STATE
       ,VW_LGY_Address.COUNTRY
       ,VW_LGY_Address.Zip
      From
        VW_LGY_Address
       ,Address
      Where
        VW_LGY_Address.ADDRESS_ID = Address.LGY_Address_ID
Conculusion
In summary, migrating legacy data to a modern system is often a challenging task that benefits from a robust design process, clear specifications, a solid framework, and processes that automate tasks while ensuring data integrity. I hope this discussion has been beneficial for your design, construction, testing, and migration projects.
If you have found this helpful, please click the like button.