
Photo by Marissa Grootes on Unsplash
Putting Oracle Cloud Buckets and Objects to Work
User-friendly interface with a scalable, versatile architecture
Table of contents
No headings in the article.
Context
Oracle Cloud Infrastructure (OCI) Buckets and Objects offer a flexible file storage solution with many opportunities for use. A Bucket is a container for storing Objects in a Compartment that is governed by Policies defined in the Namespace. An Object is a file of any data type or is unstructured data that can be uploaded, replaced, or deleted.
Buckets are Workspace and database instance independent, can be backed up with OCI services, and do not consume space in Oracle dump files as storage of Objects in database tables do.
Blog Objectives
Make it easy to manage Buckets and Objects through an APEX application and integrate OCI and external data sources into one user-interface.
The logical question is OCI offers console functionality for managing Buckets and Objects, why not use it? APEX can augment the functionality found in the OCI Console and build upon the OCI API functionality offered. The OCI Console is great for system administrators and for in depth administration and use. APEX pages offering query, delete, preview, and upload functionality allow for addition of application-based attributes and creation of interfaces exposing select functionality for a variety of users with differing objectives, and authorization and skill levels. APEX can also create a more unified interface bringing together OCI Buckets and Objects with other external repositories, such as AWS.
- Set the foundation for automated processing of files received and sent through an sFTP server with Buckets and Objects. (Future Blog post) Sending and receiving files from external sources, and their processing can become very involved and fraught with opportunities for mistakes. Version control, assurance that each file was processed correctly, tracking of files and processes performed, handling of errors, etc., create risks that can be mitigated through automation. The future Blog will give a high-level overview of a solution for automating much of the process, so staff only need focus on review and process monitoring.
Pre-requisites
- Oracle Cloud free-tier or paid account
- Creation of Buckets and corresponding REST services for access
- Creation of proper web credentials The pre-requisites are not within the scope of this blog. Adrian Png @fuzziebrain did a great job describing how to accomplish these pre-requisites (and offers a similar solution for viewing Buckets and Objects in APEX) in his blog Better File Storage in Oracle Cloud
Solution
Let's begin with a diagram of the overall solution architecture.
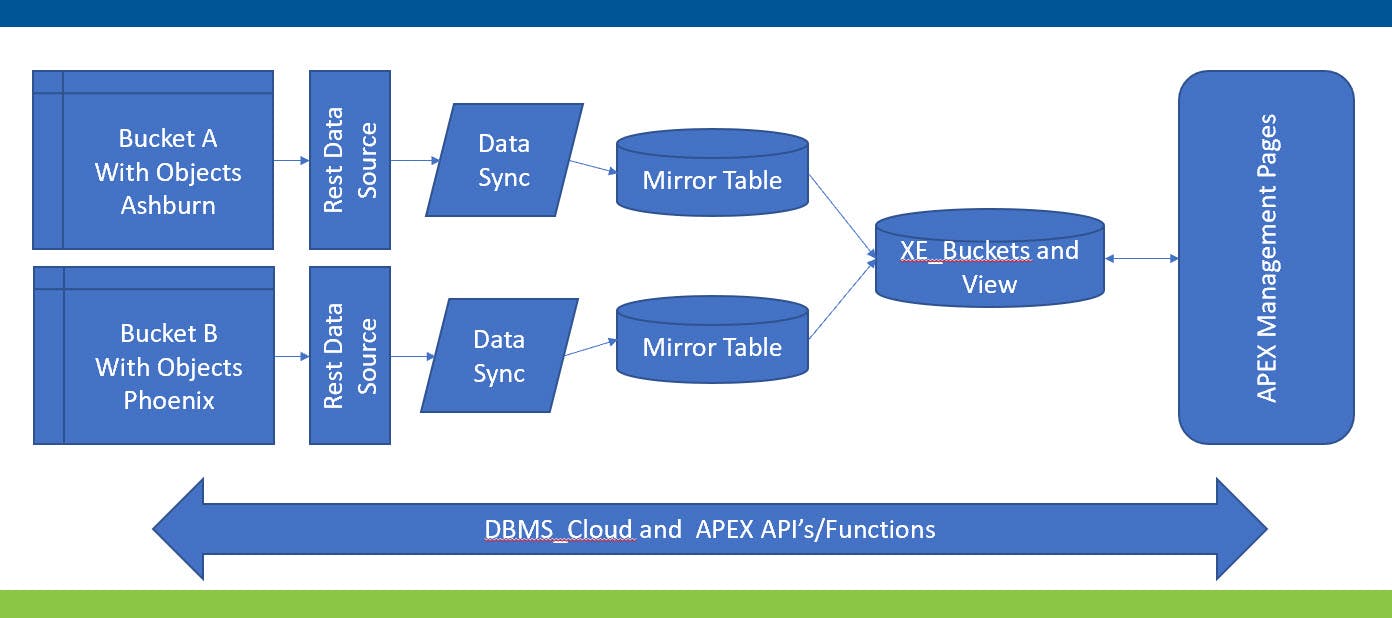
Buckets and Objects can synchronize on demand and/or an automated schedule to mirror local tables through REST Data Sources. The mirror tables can exactly represent the REST data source definition, or the mirror tables can have additional user-defined columns that are ignored during synchronization. Synchronization can merge, append, or replace. The left half of the diagram above illustrates two buckets A & B in different regions, Ashburn and Phoenix, defined with individual REST data sources and synchronized with individual Mirror Tables through a Merge process on a scheduled basis. The mirror tables do not have additional user-defined columns in this architecture.
The described solution will have a process that runs in an APEX automation or on demand that synchronizes the two mirror tables into a table named XE_Buckets containing user-defined columns. The APEX application primarily will interact with XE_Buckets for query and user-defined column management. It will primarily use DBMS_Cloud and APEX functions to manage objects.
Why not add the user-defined columns to the Mirror Tables? Why does XE_Buckets need to exist at all? Good questions.
Inclusion of a table like XE_Buckets with user-defined columns offers a layer of encapsulation protecting applications from structural/functional changes that occur in the stream from Buckets to the Mirror Tables and makes it easier to adapt to those changes. If column existence or usage changes in the Buckets, XE_Buckets may be able to shield the application from those changes and/or adaption may be able to occur at the step between the mirror table and XE_Buckets minimizing required changes in the application at all the touch points. If user defined column requirements change, they only need to occur in XE_Buckets, not each of the mirror tables. If additional data sources are added, for example an AWS data source, it can be better managed as an addition to XE_Buckets management than throughout the application where it touches various data sources.
The APEX Management pages will support viewing all Buckets and attributes, and object listing, deletion, uploading, downloading, and preview (depending on file type). The tables and data will support the second objective of automating file processing to the extent possible.
Step by Step:
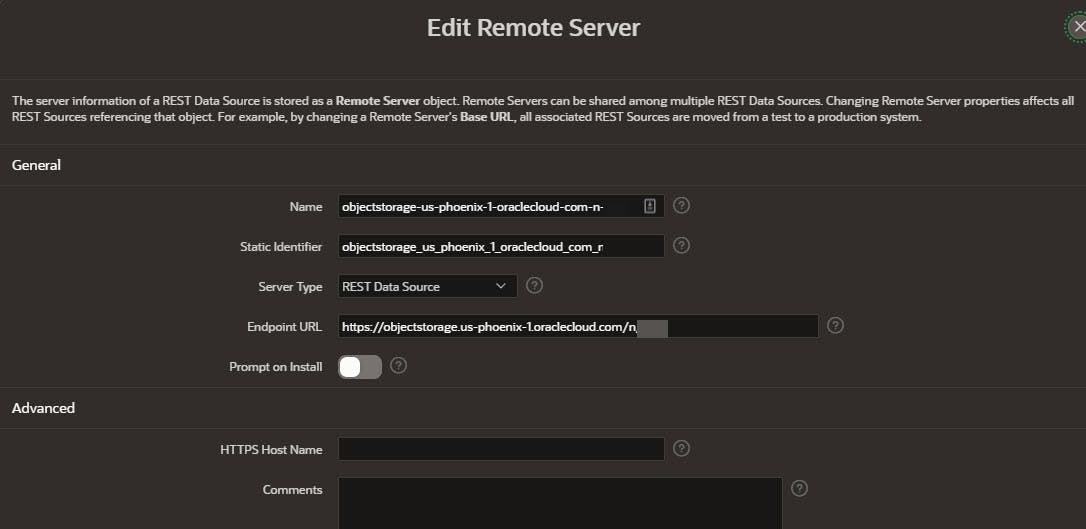
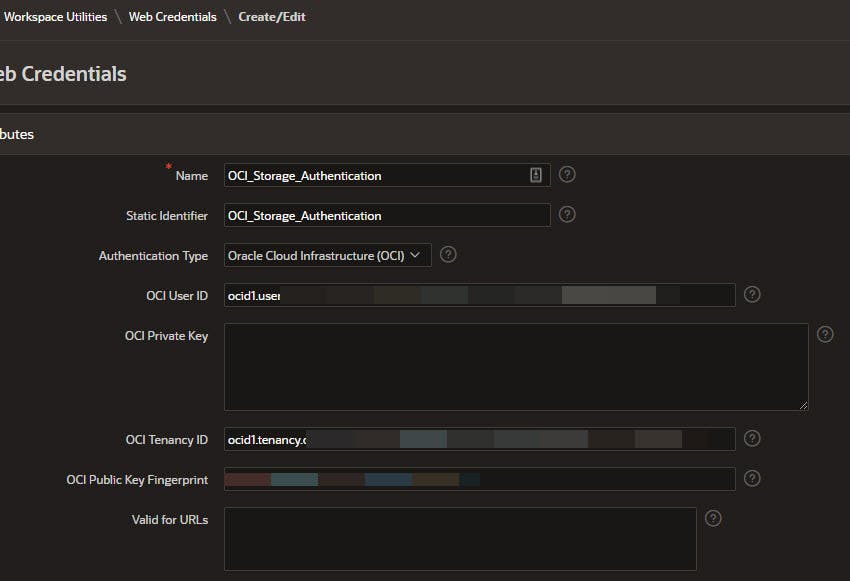
Consistent with the diagram above, and Adrian's blog, buckets in the Ashburn and Phoenix region were created with necessary credentials. As an example, below is the Remote Data Server and Credential definitions for the Bucket in the Phoenix region.
Below is the REST data source definition for Phoenix. Note the "Manage Synchronization" option in the right most pane.

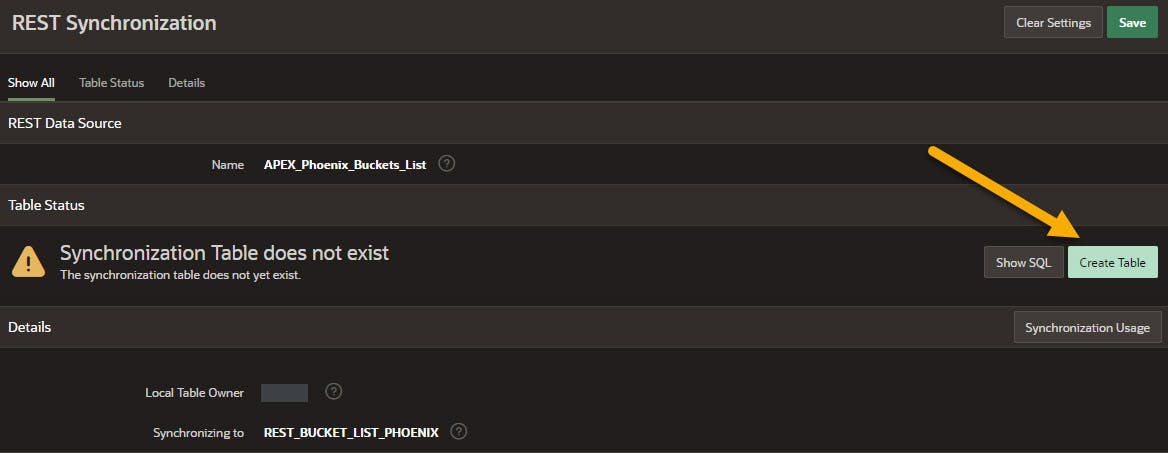
Select the schema for the synchronization and name the Mirror Table that will be synchronized with the REST Data Source. Columns will be identical to the REST data source unless you decide to add user-defined columns in the next step. If a suitable table already exists it can be selected.
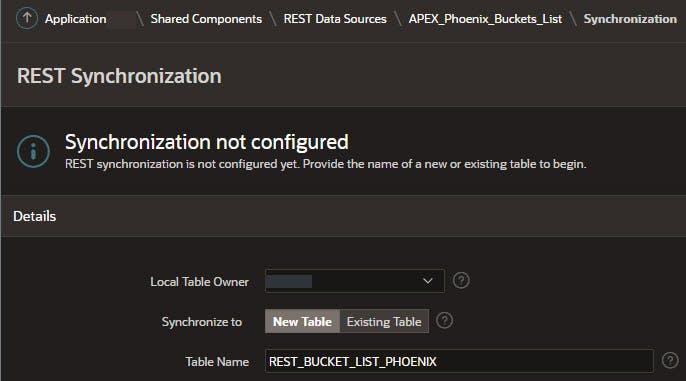
Select Create Table unless an existing table is selected
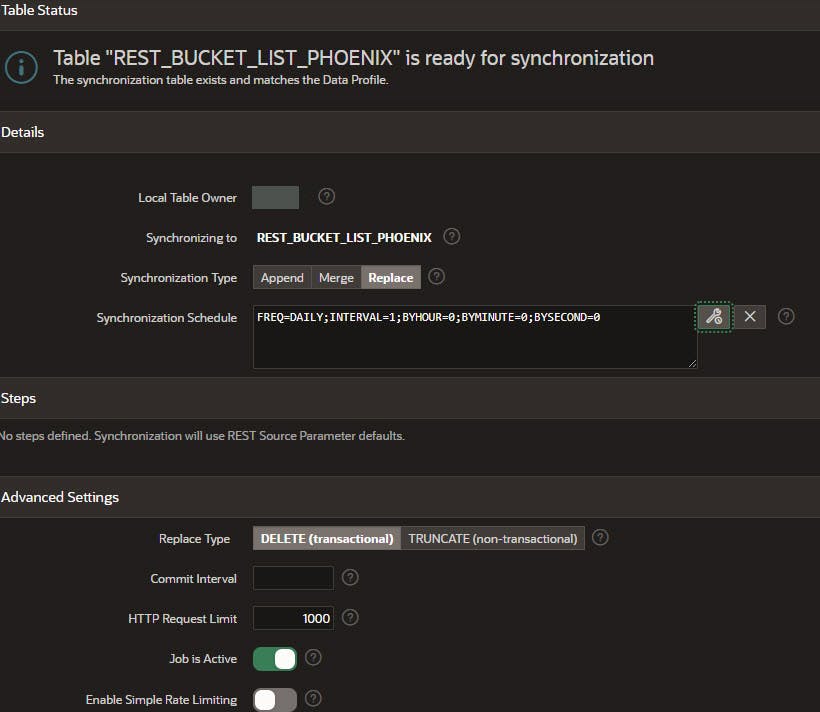
Select the Table Owner schema, synchronization type, and create an automation schedule. Replace is selected so the mirror table always represents the current state at time of synchronization, and because there are not user-defined columns. Merge would be more appropriate if there are user-defined columns. Create a synchronization schedule by clicking on the wrench icon to the right of the box and select your options. This example synchronizes once a day because not many changes are anticipated to the buckets, and it can be executed on demand.
By choosing Delete (transactional) if there is an error in the process it will not leave an empty table, but instead revert to its status before the attempted synchronization.
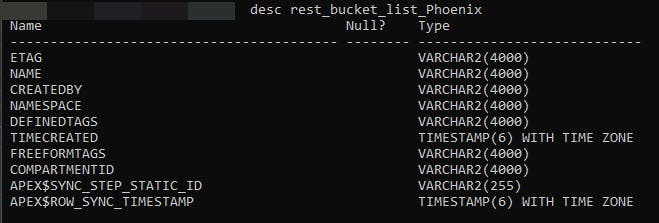
Executing Desc Rest_Bucket_List_Phoenix in SQL shows the resulting mirror table and its structure.
Now let's create XE_Buckets and its View. This is where additional or different bucket user-defined columns can be added.
Create Table XE_BUCKETS
    (
    XE_BUCKETS_ID           NUMBER(20)            GENERATED BY DEFAULT ON NULL AS IDENTITY NOCACHE,
    BU_BUCKET_NAME          VARCHAR2(256 CHAR)  Constraint XE_BUCKETS_NA_NN Not Null,
    BU_URI_CID              Number(20)          Constraint XE_Buckets_UR_NN Not Null,
    BU_NAMESPACE_CID        Number(20)          Constraint XE_BUCKETS_NS_NN NOT NULL,
    BU_CREDENTIAL_CID       Number(20)          Constraint XE_BUCKETS_CR_NN NOT NULL,
    BU_BUCKET_TYPE_CID      Number(20)          Constraint XE_Buckets_TY_NN NOT NULL,
    BU_DB_INSTANCE_CID      Number(20)          Constraint XE_Buckets_IN_NN Not Null,
    BU_EFFECTIVE            DATE                Default on Null Trunc(Current_Date) CONSTRAINT XE_BUCKETS_EE_NN  NOT NULL ,
    BU_EXPIRES              DATE                Default on Null To_Date('12/31/2999','MM/DD/YYYY') CONSTRAINT XE_BUCKETS_EX_NN    NOT NULL ,
    SY_USER_ID_ADD          NUMBER(20)          CONSTRAINT XE_BUCKETS_UA_NN  NOT NULL,
      SY_DATE_ADD             DATE                CONSTRAINT XE_BUCKETS_DA_NN  NOT NULL,
      SY_USER_ID_MOD          NUMBER(20),
      SY_DATE_MOD             DATE      ,
      VC_BU_BUCKET_NAME_CAPS  Generated Always as (Upper(BU_BUCKET_NAME)),
      Constraint              XE_Buckets_UR_FK Foreign Key ( BU_URI_CID )         References Codes_Value(Codes_Value_ID),
      Constraint              XE_Buckets_NA_FK Foreign Key ( BU_NAMESPACE_CID )   References Codes_Value(Codes_Value_ID),
      Constraint              XE_Buckets_CR_FK Foreign Key ( BU_CREDENTIAL_CID )  References Codes_Value(Codes_Value_ID),
      Constraint              XE_Buckets_TY_FK Foreign Key ( BU_BUCKET_TYPE_CID)  References Codes_Value(Codes_Value_ID),
      Constraint              XE_BUCKETS_BU_PK Primary Key ( XE_BUCKETS_ID )
    );
    /
Notes on the XE_Buckets structure:
- Bucket Name: Bucket Name exactly as it appears in OCI with case sensitivity.
- Columns ending in CID are primary keys from a table of code names and values as described in this Blog Easy Management of Codes and Values Among other things it avoids having to create separate tables and APEX add/update/delete forms for each code. Alternatively, make the columns Varchar2 and populate them by entering the values directly and/or according to your own standard methods.
- BU_URI_CD: OCI endpoint for the particular bucket, for example objectstorage.us-ashburn-1.oraclecloud.com The Code Value table would contain all the OCI storage endpoints in use.
- BU_Namespace_CID: Compartment OCI Namespace of this Bucket.
- BU_Credential_CID: Correct credential for this Bucket, such as OCI$RESOURCE_PRINCIPAL, DEF_CRED_NAME, etc.
- BU_Bucket_Type_CID: User-defined value for what the Bucket is used for. For example, general storage, documents, system files, etc.
- BU_DB_Instance_CID: Database instance this bucket's contents are primarily used in. Buckets and Objects themselves are instance independent but this supports identifying buckets as primarily used in Dev, Test, Prod, or Any instance. The APEX Application and database procedures, functions, etc. can then easily distinguish between buckets and use the relevant one depending on the current database instance. For example, when in Development the code can point to the development version for documents, vs. when in Production use the Production bucket for documents. Development and Testing can then occur without interfering with Production Buckets and Objects.
- BU_Effective and BU_Expires: User-defined date range this entry is valid for
- SY Add and Mod columns: Used for tracking who and when the entries were created and last modified. Columns are maintained automatically in a trigger using the currently signed in User ID.
- VC_BU_Bucket_Name_Caps: Virtual column with the upper-case version of the bucket name.
Next create a VW_XE_Buckets view for linking the user-defined columns to the code table to get their descriptive values.
Create or Replace View VW_XE_Buckets
  As
  Select
     XE_Buckets.XE_BUCKETS_ID
    ,XE_Buckets.BU_BUCKET_NAME
    ,XE_Buckets.BU_URI_CID
    ,CID_URI.VC_CV_VALUE              BU_URI
    ,XE_Buckets.BU_NAMESPACE_CID
    ,CID_Namespace.VC_CV_Value        BU_Namespace
    ,XE_Buckets.BU_CREDENTIAL_CID
    ,CID_Credential.VC_CV_Value       BU_Credential
    ,XE_Buckets.BU_BUCKET_TYPE_CID
    ,CID_Bucket_Type.VC_CV_Value      BU_Bucket_Type
    ,XE_Buckets.BU_DB_Instance_CID
    ,CID_DB_Instance.VC_CV_Value     BU_DB_Instance
    ,XE_Buckets.BU_EFFECTIVE
    ,XE_Buckets.BU_EXPIRES
    ,XE_Buckets.SY_USER_ID_ADD
    ,XE_Buckets.SY_DATE_ADD
    ,XE_Buckets.SY_USER_ID_MOD
    ,XE_Buckets.SY_DATE_MOD
    ,XE_Buckets.VC_BU_BUCKET_NAME_CAPS
    ,(CID_URI.VC_CV_VALUE || '/n/' || CID_Namespace.VC_CV_Value || '/b/' || XE_Buckets.BU_Bucket_Name || '/o/') BU_FULL_URI

  From  XE_Buckets
       ,Codes_Value CID_URI
       ,Codes_Value CID_Namespace
       ,Codes_Value CID_Credential
       ,Codes_Value CID_Bucket_Type
       ,Codes_Value CID_DB_Instance

  Where     XE_Buckets.BU_URI_CID         = CID_URI.Codes_Value_ID
        And XE_Buckets.BU_Namespace_CID   = CID_Namespace.Codes_Value_ID
        And XE_Buckets.BU_Credential_CID  = CID_Credential.Codes_Value_ID
        And XE_Buckets.BU_DB_Instance_CID = CID_DB_Instance.Codes_Value_ID
        And XE_Buckets.BU_Bucket_Type_CID = CID_Bucket_Type.Codes_Value_ID
Each code CID is translated into its description equivalent. The view column BU_FULL_URI combines URI, Namespace, and Bucket Name Code values to create a column with the full bucket URI for use.
Below is an Interactive Grid (IG) with VW_XE_Buckets as the Source, with an excerpt listing Ashburn and Phoenix buckets with user-defined attributes included.
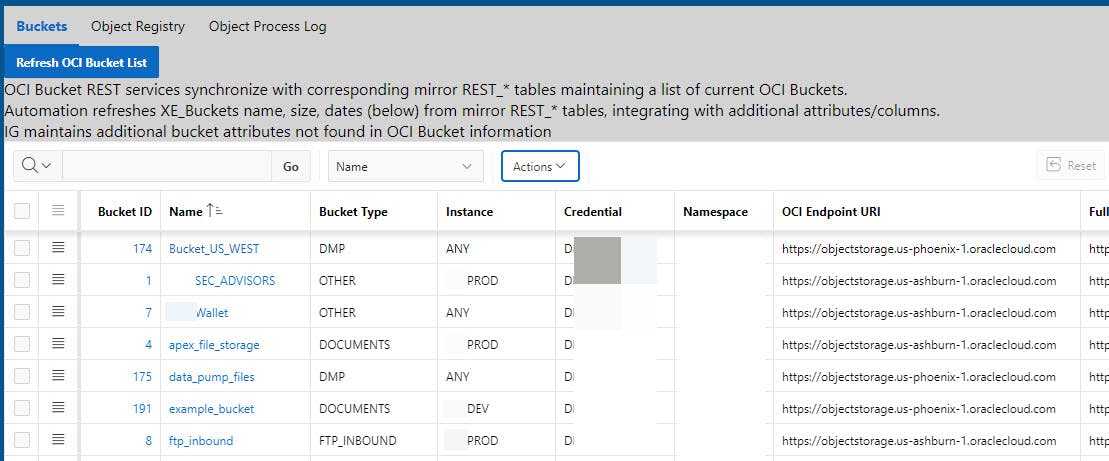
The "Refresh OCI Bucket List" button uses Merge statements to update XE_Buckets with the latest information from the REST Mirror Tables. The button generally is not needed because of infrequent changes to buckets. The refresh process should be scheduled as an APEX Automation to make sure the XE_Buckets table is kept current.
The refresh code for this button and the automated procedure is below. g_Date_Infinity is a constant defined in the referenced Package. Wrap the code in your standard logging and error tracking code.
Declare
    v_URI_CID             XE_Buckets.BU_URI_CID%Type;
    v_NameSpace_CID       XE_Buckets.BU_Namespace_CID%Type;
    v_Credential_CID      XE_Buckets.BU_Credential_CID%Type;
    v_BU_BUCKET_TYPE_CID  XE_Buckets.BU_BUCKET_TYPE_CID%Type;
    v_BU_DB_INSTANCE_CID  XE_Buckets.BU_DB_INSTANCE_CID%Type;
Begin
    -- Expire all entries.  Merge will re-instate those that are still active.
    -- Expired can then be deleted later or retained based on your need.
    Begin
        Update XE_Buckets
            Set XE_Buckets.BU_Expires = Current_Date
            Where XE_Buckets.BU_Expires > Current_Date;
    End;
    -- Lookup primary key values for user-defined columns in Codes table (Ashburn)
    v_URI_CID         := Pkg_Codes_Value.Qry_Code_Value_To_ID(p_CO_Name_Abrev    =>    'OCI_ENDPOINT_URI',
                                 p_CV_Value_Character    =>    'https://objectstorage.us-ashburn-1.oraclecloud.com');
    v_Namespace_CID   := Pkg_Codes_Value.Qry_Code_Value_To_ID(p_CO_Name_Abrev    =>    'OCI_NAMESPACE',
                                      p_CV_Value_Character    =>    '[your namespace here]');
    v_Credential_CID  := Pkg_Codes_Value.Qry_Code_Value_To_ID(p_CO_Name_Abrev    =>    'OCI_CREDENTIAL_NAME',
                                    p_CV_Value_Character    =>    'DEF_CRED_NAME');
    v_BU_BUCKET_TYPE_CID := Pkg_Codes_Value.Qry_Code_Value_To_ID( p_CO_Name_Abrev =>  'BUCKET_TYPE',
                                                 p_CV_Value_Character=>  'OTHER');
    v_BU_DB_Instance_CID := Pkg_Codes_Value.Qry_Code_Value_To_ID( p_CO_Name_Abrev     =>  'DB_INSTANCE',
                                                                      p_CV_Value_Character=>  'ANY',
                                                                      p_Error_On_No_Find  =>  'Y');

        Begin
      MERGE INTO XE_Buckets x
      USING (Select Name, CreatedBy, TimeCreated From Rest_APEX_Storage_List_Buckets) r
      ON (Upper(r.Name) = x.VC_BU_Bucket_Name_CAPS)
          WHEN MATCHED THEN
              -- Restore bucket status as active since it still exists.
              Update set x.BU_Expires = Pkg_Codes_Value.g_Date_Infinity
          WHEN NOT MATCHED THEN
              INSERT ( x.BU_Bucket_Name
                      ,x.BU_URI_CID
                      ,x.BU_NAMESPACE_CID
                      ,x.BU_CREDENTIAL_CID
                      ,x.BU_BUCKET_TYPE_CID
                      ,x.BU_DB_Instance_CID
                      ,x.BU_Effective
                      ,x.BU_Expires)
              values(  r.Name
                      ,v_URI_CID
                      ,v_Namespace_CID
                      ,v_Credential_CID
                      ,v_BU_BUCKET_TYPE_CID
                      ,v_BU_DB_Instance_CID
                      ,Trunc(r.TimeCreated)
                      ,Pkg_Codes_Value.g_Date_Infinity)
              ;
        End;
        v_Section         := '140:';
    -- Initialize default values
    v_URI_CID         := Pkg_Codes_Value.Qry_Code_Value_To_ID(p_CO_Name_Abrev                =>    'OCI_ENDPOINT_URI',
                                                                                                  p_CV_Value_Character    =>    'https://objectstorage.us-phoenix-1.oraclecloud.com',
                                                                                                  p_Error_On_No_Find        =>  'Y');
    v_Section         := '160:';
        Begin
      MERGE INTO XE_Buckets x
      USING (Select Name, CreatedBy, TimeCreated From Rest_Bucket_List_Phoenix) r
      ON (Upper(r.Name) = x.VC_BU_Bucket_Name_CAPS)
          WHEN MATCHED THEN
              -- Restore bucket status as active since it still exists.
              Update set x.BU_Expires = Pkg_Codes_Value.g_Date_Infinity
          WHEN NOT MATCHED THEN
              INSERT ( x.BU_Bucket_Name
                      ,x.BU_URI_CID
                      ,x.BU_NAMESPACE_CID
                      ,x.BU_CREDENTIAL_CID
                      ,x.BU_BUCKET_TYPE_CID
                      ,x.BU_DB_Instance_CID
                      ,x.BU_Effective
                      ,x.BU_Expires)
              values(  r.Name
                      ,v_URI_CID
                      ,v_Namespace_CID
                      ,v_Credential_CID
                      ,v_BU_BUCKET_TYPE_CID
                      ,v_BU_DB_Instance_CID
                      ,Trunc(r.TimeCreated)
                      ,Pkg_Codes_Value.g_Date_Infinity)
              ;
        End;
   Exception
       When Others Then
          -- Your Logging and error code here
End;
Next, maintain the local Buckets table XE_Buckets by creating a Modal Form to update, and delete a Bucket row. Link the XE_Buckets Page IG Bucket Name column to the XE_Buckets Update Modal Form. (Addition of OCI Bucket entries into XE_Buckets should occur through the Refresh Bucket List automated process, either scheduled or on-demand with the button.)
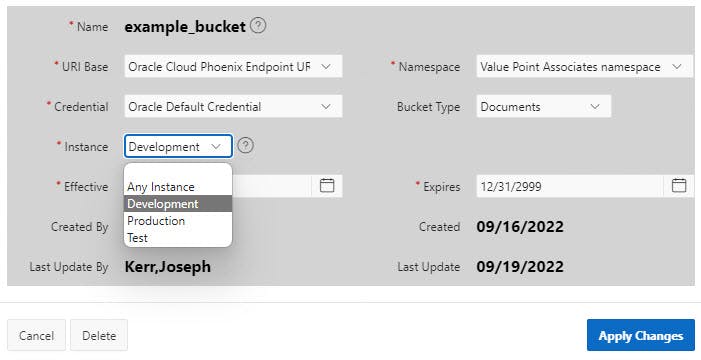
Note the Select Lists for "code" columns ending in CID that draw upon the values in "code values" view described in the Easy Management of Codes and Values blog.
The Source SQL Query code is the same for each column except for the Code Abbreviation changing to match the type of code, which is also embedded in the column name. BU_ [Abbreviation] _CID.
  Select CV_Description, Codes_Value_ID
  From VW_CODES_CUR_FULL
  Where VC_CO_NAME_ABREV_CAPS = 'BUCKET_TYPE' And
        Current_Date Between CV_Effective and CV_Expires And
        Current_Date Between CO_Effective and CO_Expires
  Order By CV_Description
The Default value Source is set to:
  Select CV_Description, Codes_Value_ID
  From VW_CODES_CUR_FULL
  Where VC_CO_NAME_ABREV_CAPS = 'BUCKET_TYPE' And
        Current_Date Between CV_Effective and CV_Expires And
        Current_Date Between CO_Effective and CO_Expires
  Order By CV_Description
  Fetch first 1 rows only;
Next step is to add Pages to list, upload, download, delete and preview Objects in a particular Bucket.
List:
Add a Modal Page for listing and managing Objects in a particular bucket. The List Modal Form is Bucket specific and should be linked to the Bucket List Page Bucket ID column and pass Bucket ID as a parameter. Below is an example Page before any objects are in the Bucket selected with the "Upload Object" menu choice displayed. "Upload Object" could be added to the menu or shown separately as a button.

The Bucket Objects list is an IG whose Source SQL Query is shown below. The IG is dependent on the calling Page passing :P33_XE_Buckets_ID as a parameter and the Before Header :P33_INIT_PARAMETERS process (SQL Query and Init Parameters Code below) looking up Credential, Bucket Full URI, and Bucket Name Page Items using :P33_XE_BUCKETS_ID. Yes, these values could have been passed as parameters, but to maximize the flexibility of the Page only the XE_Buckets_ID is required so if there are instances where those other values are not readily available, they are not required.
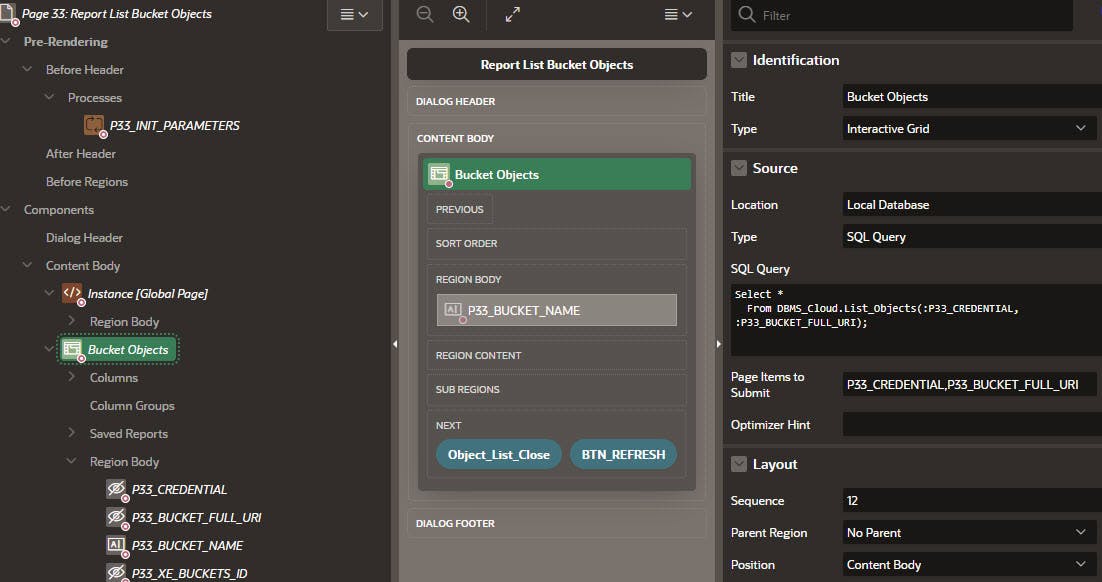
IG Source SQL Query:
Select *
  From DBMS_Cloud.List_Objects(:P33_CREDENTIAL, :P33_BUCKET_FULL_URI);
:P33_Init_Parameters
Declare
  v_Message         App_Error.Ae_Message%Type;
  e_Error           Exception;

Begin

  If :P33_XE_BUCKETS_ID Is Not Null then
    Begin
      Select  BU_Credential
             ,BU_Full_URI
             ,BU_BUCKET_NAME
        Into  :P33_CREDENTIAL
             ,:P33_BUCKET_FULL_URI
             ,:P33_BUCKET_NAME
        From VW_XE_Buckets
        Where VW_XE_Buckets.XE_Buckets_ID = :P33_XE_BUCKETS_ID
              And Current_Date Between BU_Effective and BU_Expires;
    Exception
      When No_Data_Found Then
        :P33_CREDENTIAL  := Null;
        :P33_BUCKET_FULL_URI    := Null;
        :P33_BUCKET_NAME := Null;
        v_Message := 'Error: Bucket ' || :P33_XE_BUCKETS_ID || ' not found.';
        Raise e_Error;
    End;
  Else
    v_Message := 'Error: Select a Bucket first.';
    Raise e_Error;
  End If;

Exception
  When e_Error Then
    -- Your error handling here
  When Others Then
    -- Your error handling here
End;
Upload:
Add a Modal Page to upload an object to a Bucket with a File Upload region.
Add hidden Page Items of Bucket Name and XE_Buckets_ID populated with parameters from the calling Page. Or as in the previous Page pass XE_Buckets_ID and initialize Bucket Name with a Before Header Process. (Sometimes I break even my own rules :) )
Add Button :P20_UPLOAD in the Region Body with an action of Submit Page.
Add Button :P20_CANCEL in the Region Body Defined By Dynamic Action. Create a Dynamic Action as show to fire the Cancel Dialog action.
Add item :P20_FILE of File Browse type with the Properties shown below.
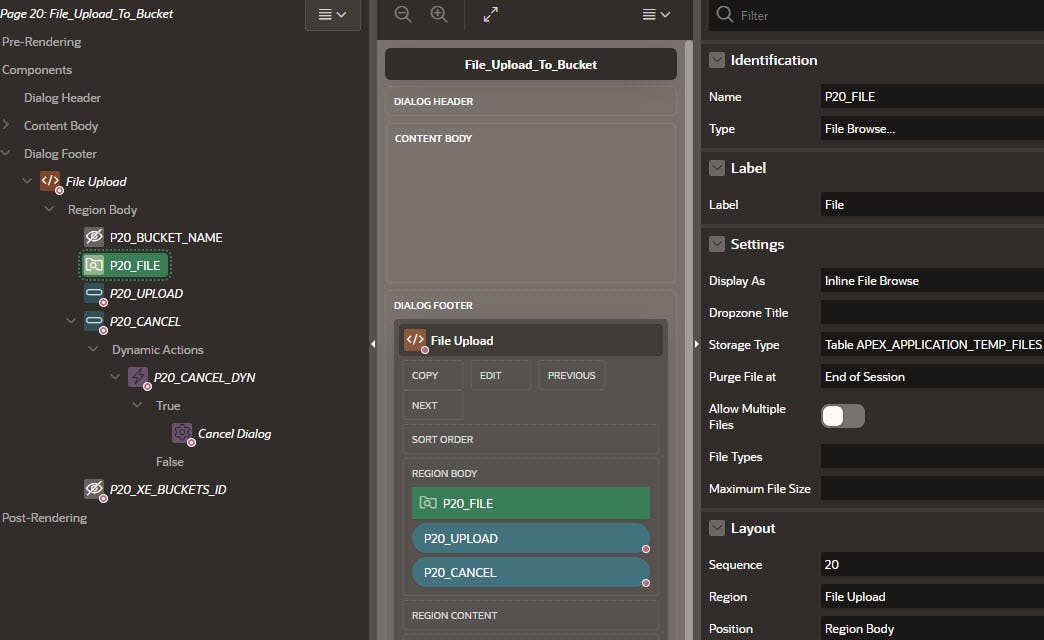
Add a Process under Processing called P20_Upload_File with the code below.
Note the apex_util.url_encode() is very important both for upload, download, preview, and any other time you refer to the Object so the name is always referred to in the same way regardless of spaces and special typing characters in the name. It may cause the Object name to look incorrect with special characters added to it, but url_encode() will handle that. File and Object names are case sensitive
declare
  l_request_url varchar2(32767);
  l_content_length number;
  v_VW_XE_Buckets VW_XE_Buckets%RowType;

  l_response clob;
  upload_failed_exception exception;
begin
  for file in (
    select * from apex_application_temp_files
    where name = :P20_FILE
  ) loop
      Select *
          Into v_VW_XE_Buckets
          From VW_XE_Buckets
          Where VW_XE_Buckets.XE_Buckets_ID = :P20_XE_Buckets_ID;
  l_request_url := v_VW_XE_Buckets.BU_Full_URI || apex_util.url_encode(file.filename);
  apex_web_service.g_request_headers(1).name := 'Content-Type';
  apex_web_service.g_request_headers(1).value := file.mime_type;
  l_response := apex_web_service.make_rest_request(
                                     p_url => l_request_url
                                   , p_http_method => 'PUT'
                                   , p_body_blob => file.blob_content
                                   , p_credential_static_id => v_VW_XE_Buckets.BU_CREDENTIAL
                                   );

  if apex_web_service.g_status_code != 200 then
    raise upload_failed_exception;
  end if;
 end loop;
Exception
  When upload_failed_exception Then
    -- Your error handling here
end;
After Upload to the specific bucket the Object should now appear in the list. The plus signs were added by the url_encode() because the filename has spaces where the pluses are. Download, delete, and preview appear as columns pointing to the functionality to be covered next.

Download and Preview:
Download and Preview are handled very similarly so will be covered together. Download will cause the browser open/save dialog to appear. Preview will display the object in a PDF viewer if the Object is a PDF document, otherwise it will show the open/save dialog as well for non-PDF Object types.
Note: If the Bucket Default Storage Tier is Archive, or Object Tiering is enabled and the Object has been archived, Download and Preview will generate a (hard to find...) Oracle error saying that the Object needs to be Restored from Archive storage first.
Create a Download Preview Modal Dialog Page with a Download Object region (will handle Preview as well).
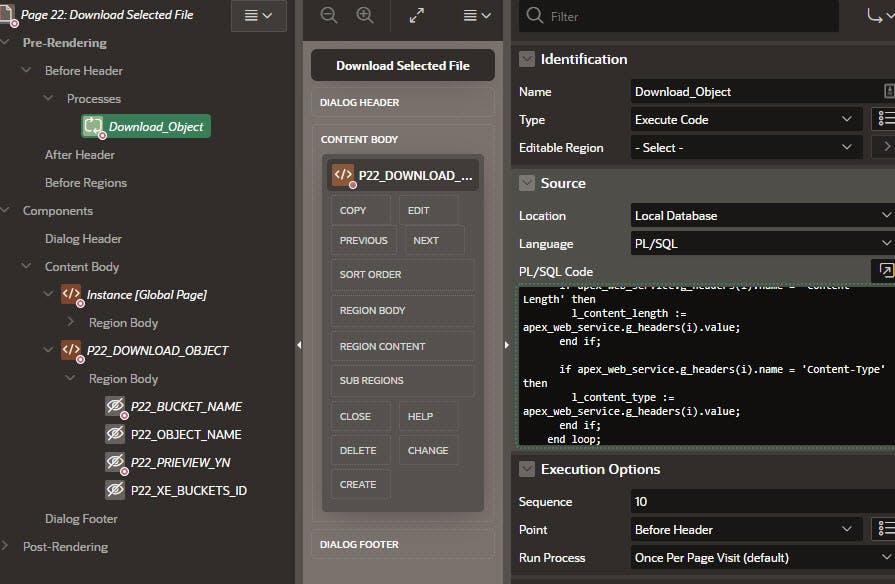
Add the following Unprotected Hidden Download Object region Page Items that will be populated as parameters from the calling Page:
- Bucket_Name
- Object_Name
- Preview_YN
- XE_Buckets_ID
Add a Before Header Process called Download_Object of Type Execute Code with the following PL/SQL code. Here is where Download vs. Preview is handled. The Preview_YN value is used to determine if Content-Disposition is inline (Preview) or attachment (Download).
declare
  l_request_url varchar2(32767);
  l_content_type varchar2(32767);
  l_content_length varchar2(32767);
  v_VW_XE_Buckets VW_XE_Buckets%RowType;
  l_response blob;
  v_Preview_YN  Varchar2(1 CHAR);
  v_Message     App_Error.AE_Message%Type;
  e_Error       Exception;
begin
  v_Preview_YN  := Upper(Substr(Nvl(:P22_PRIEVIEW_YN,'N'),1,1));
  -- In "real life" would query with a function call, use Select here to simplify Blog
  Select *
      Into v_VW_XE_Buckets
      From XE_Buckets
      Where VW_XE_Buckets.XE_Buckets_ID = :P22_XE_Buckets_ID;
  l_request_url := v_VW_XE_Buckets.BU_Full_URI || apex_util.url_encode(:P22_OBJECT_NAME);
  l_response := apex_web_service.make_rest_request_b(
                             p_url => l_request_url
                             , p_http_method => 'GET'
                             , p_credential_static_id => v_VW_XE_Buckets.BU_Credential
                             );
  if apex_web_service.g_status_code != 200 then
    raise e_Error;
  end if;
  for i in 1..apex_web_service.g_headers.count
    loop
      if apex_web_service.g_headers(i).name = 'Content-Length' then
        l_content_length := apex_web_service.g_headers(i).value;
      end if;

      if apex_web_service.g_headers(i).name = 'Content-Type' then
        l_content_type := apex_web_service.g_headers(i).value;
      end if;
    end loop;
  sys.htp.init;
  if l_content_type is not null then
    sys.owa_util.mime_header(trim(l_content_type), false);
  end if;
  sys.htp.p('Content-length: ' || apex_escape.html(l_content_length));
  If v_Preview_YN = 'Y' Then
    sys.htp.p('Content-Disposition: inline; filename="' || apex_escape.html(:P22_OBJECT_NAME) || '"' );
  Else
    sys.htp.p('Content-Disposition: attachment; filename="' || apex_escape.html(:P22_OBJECT_NAME) || '"' );
  End If;
  sys.htp.p('Cache-Control: max-age=3600'); -- if desired
  sys.owa_util.http_header_close;
  sys.wpg_docload.download_file(l_response);
  apex_application.stop_apex_engine;
end;
Now back to the Object List Modal Dialog to add columns to call the Download / Preview Page.
Add a Download column to the Bucket Objects IG of type Link, Link text equal to "Download", and Link Attributes of:
class="t-Button t-Button–link"
The Link settings are shown below pointing to the newly created Download / Preview Page. Since this is the Download column the Preview_YN parameter is set to N.
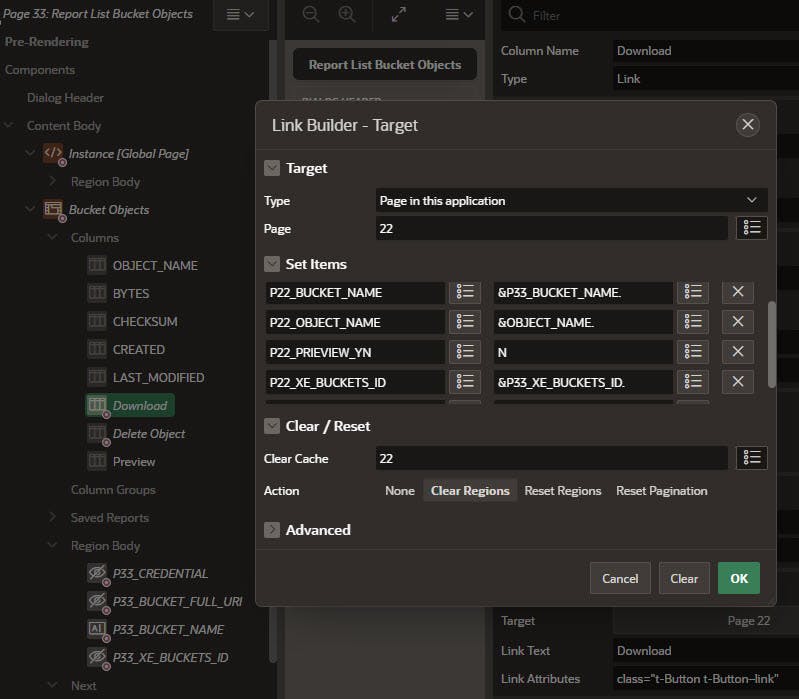
The Preview column is created and defined similar to the Download column except the Link Text is "Preview" and the Preview_YN parameter is set to Y
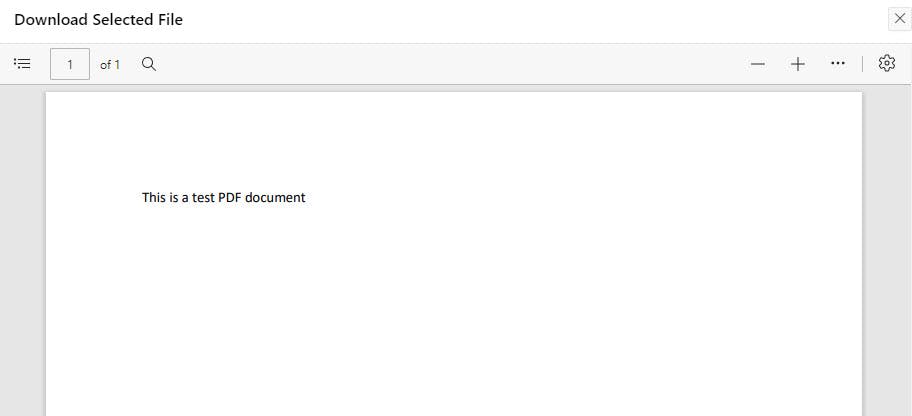
Previewing the test PDF document yields:
Delete
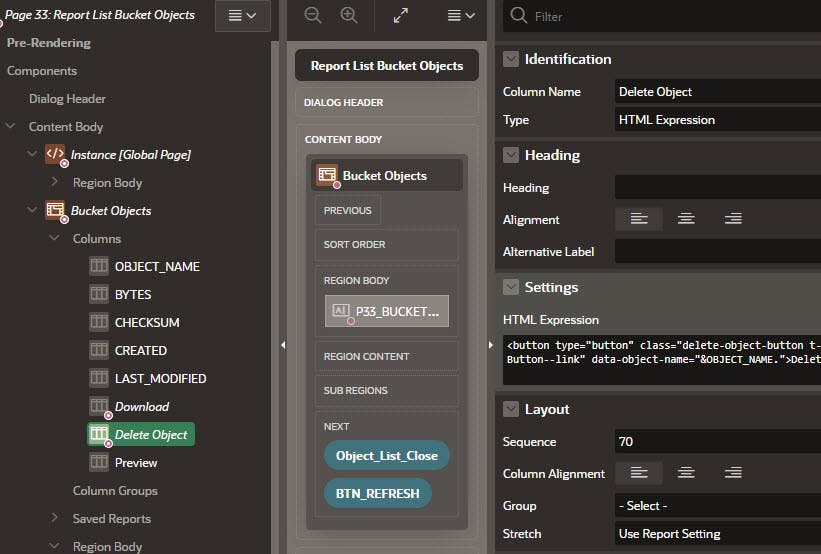
Add a Delete Object Column to the Bucket Objects IG with default values and Type HTML Expression and HTML Expression of:
<button type="button" class="delete-object-button t-Button t-Button--link" data-object-name="&OBJECT_NAME.">Delete</button>
At the Page Level, Function and Global Variable Declaration add the following function:
var oss = {
  deleteObject: function(bucketName, objectName, report) {
    if(confirm('Are you sure?')) {
      var result = apex.server.process('DELETE_OBJECT', {
        x01: bucketName,
        x02: objectName
      });
      result.done(function(data) {
        apex.message.showPageSuccess(
          'Object deleted successfully.');
        apex.event.trigger(report, 'apexrefresh');
      }).fail(function (jqXHR, textStatus, errorThrown) {
        apex.message.alert('Failed to delete object.');
      });
    }
  }
};
Clicking on the Delete link will cause the Browser to display a confirmation dialog box and proceed accordingly.
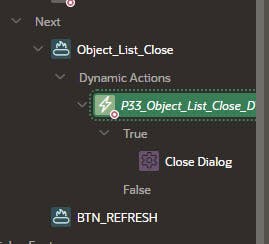
Lastly, add Close Dialog and Refresh List (Submit Page action) as shown below.
In summary, the Bucket and Object architecture offers a level of protection against storage definition and process changes, and versatility in handling multiple data sources. Bucket and Object management functionality is now available in an APEX application in a user-friendly interface laying the foundation for more direct usage of the Objects in the application. For example, automating the processing of Objects, Document Management, Oracle AI OCR processing as described by Jon Dixon OCR AI, and many more opportunities...
Automation of inbound and outbound sFTP server file processing with Buckets and Objects will be the subject of a future Blog. Stay tuned...
I hope you found this helpful, comments and likes welcome :)

