
Photo by Lukas Blazek on Unsplash
Managing Automations in an APEX application
Automations in one page...
Table of contents
No headings in the article.
Context
Oracle APEX Automations execute a sequential set of actions based on a schedule and/or query results through the Application Builder Shared Components interface. Log results are retained for a default 14-day period that can be increased to a maximum of 180 days through the Administration Services Logs and Reports interface. After importing an APEX application, automations are disabled and must be re-enabled or executed to reactivate the automation schedule(s). APEX Automations are built upon DBMS_Scheduler functionality.
Objectives
Provide insight into APEX Automations inventory, schedules, status, and logs, and offer execute now and re-enable automation functionality within an APEX application, augmenting what is available in APEX Application Builder Shared Components.
Benefit
- Expose these features without having to grant access to Application Builder.
- Allow integration with other APEX application functionality in a single user interface.
- After importing an APEX Application, the automations can then be re-enabled and checked through the APEX Application or the Application Builder Shared Components interface.
- Though not covered in this Blog, if the 180 day maximum log retention is insufficient for regulatory or compliance reasons the interface could be augmented with local tables and an automated job that periodically saved log entries locally through a merge process.
Pre-Requisites
Free FOS Plugins ( Free FOS Plugins ) need to be installed as Plugins in Application Shared Components. Specifically the following Plugins are used:
-- FOS-Interactive Grid Add Button
-- FOS- Execute PL/SQL Code ( Not required, APEX Execute PL/SQL Code ok)
(Alternatively, addition of action items could be accomplished with links on the IG columns and buttons instead of using the FOS Plugins to create Action and Row menu items.)
Familiarity with creating APEX Application pages and Interactive Grids (IG)
Solution
APEX views expose APEX Automation job and log data, and APIs support functionality that is easily incorporated into an APEX application. Create Master/Detail Interactive Grids that query APEX Automation tables displaying automation jobs and related log entries. Add Grid and Row menu items to enable, disable, and execute automations individually, or as a whole.
Why IG instead of a Classic or Interactive Report? IGs are used here with the Edit Attribute enabled and Add Row, Update Row, and Delete Row disabled to activate the IG Action and "Hamburger" Row menus. Then the FOS free plugins can be used to add Executing an Automation, Disable an Automation, Enable an Automation, and Enable All Automations menu choices and actions.
Begin by creating an Application Log Administration page with a master Interactive Grid titled "Automation Actions" whose Source is:
Select *
From APEX_Appl_Automations;
APEX_Appl_Automations is an APEX "system" view containing scheduled job detail attributes as shown below. Under Attributes uncheck "Select First Row" the reason will be described later.
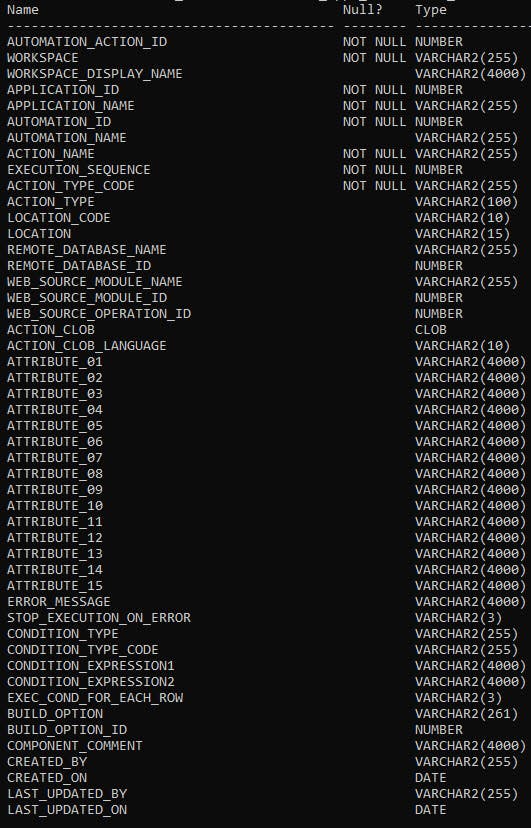
Use the IG Actions drop down to uncheck columns that do not need to be displayed for your use. The SQL Source query could alternatively limit columns queried but that requires changes to code to add/remove columns later vs. re-checking/un-checking the column under the Action Menu to restore/remove it to the interface. Presence of a "Polling Next Run Time Stamp" value indicates the job is enabled except for jobs that are tagged as "On-Demand", which the last job in the list is. Below is an example:
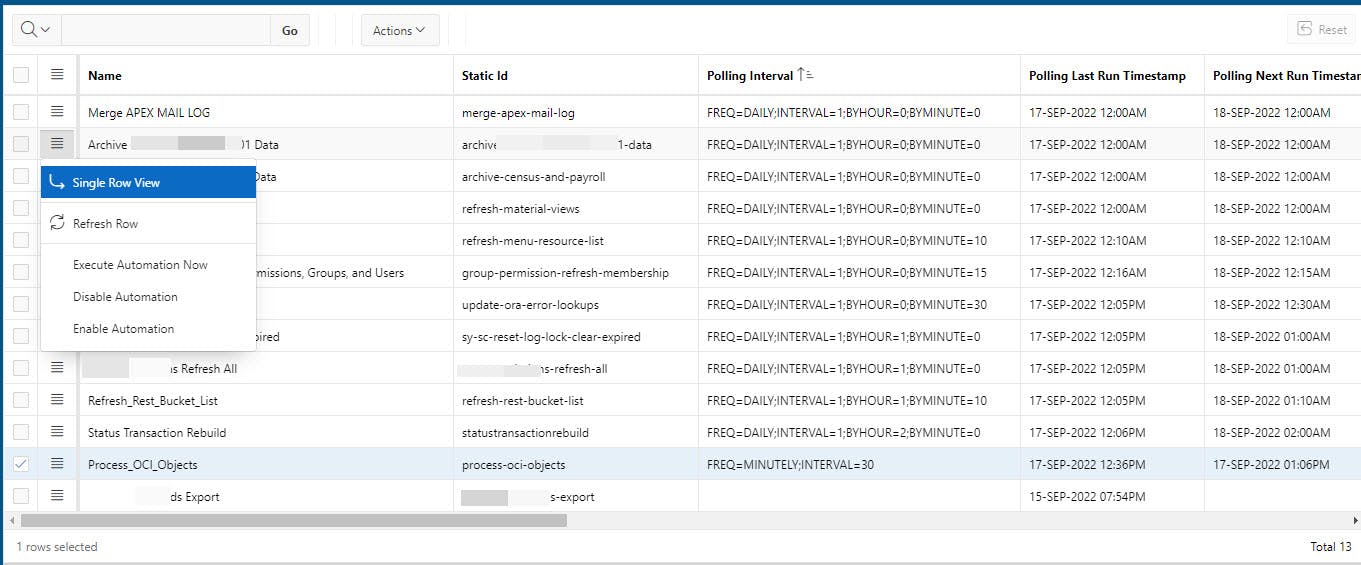
Note the row level "Hamburger" menu choices offering Enable, Disable, and Execute on the selected automation job. The Action Menu drop down list (not expanded) includes "Enable all Automations" that can be used after APEX Application import or to simply reset all jobs to enabled.
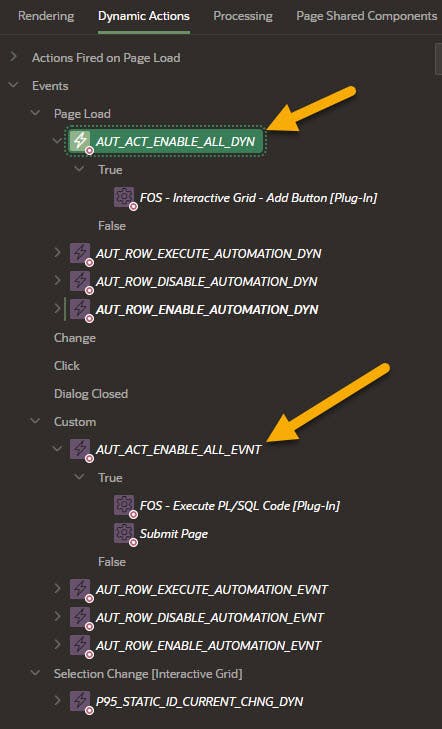
Next let's build the Dynamic Actions needed to enable these menu choices. Below are the Dynamic Actions for the page. The naming convention is AUT for automations, ACT (Action Menu) / ROW_ (Row Menu), Action (Enable All, Execute Automation, Disable...), and DYN (Dynamic Action) / EVNT (Dynamic Action Custom Event). Custom events share the same beginning to the name with their corresponding menu dynamic action. The Dynamic Actions under Page Load place the actions in the appropriate menu and trigger the corresponding Custom Events found under Custom. The P95_Static_ID_Current_Chng_DYN is triggered when a different row is selected updating the value with the current row's primary key (In this case STATIC_ID).
Starting with the Action Menu choice to "Enable All Automations", the corresponding Dynamic Actions are AUT_ACT_ENABLE_ALL_DYN that adds the Actions drop down menu choice and triggers the "enable_all_automations" custom event in AUT_ACT_ENABLE_ALL_EVNT.
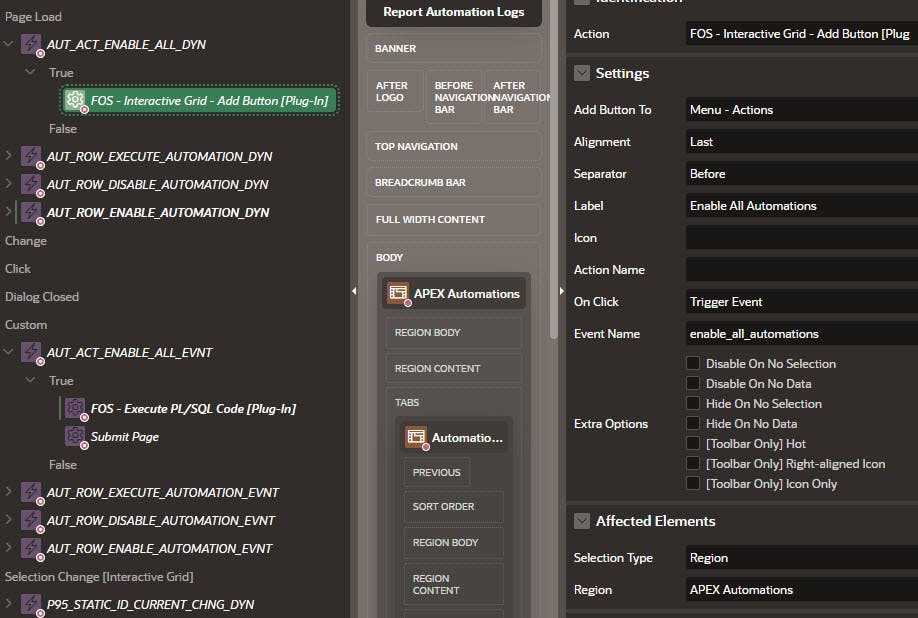
AUT_ACT_ENABLE_ALL_DYN is set with default attributes under "Page Load". Add a True Action with FOS - Interactive Grid Add Button [Plug In] to create the Actions Drop Down Menu item. Set attributes as shown below. Note the Event Name is case sensitive.
AUT_ACT_ENABLE_ALL_EVNT executes when triggered by the "enable_all_automations" Custom Event in the APEX Automations region. Add the Dynamic Event with the corresponding attributes shown below.
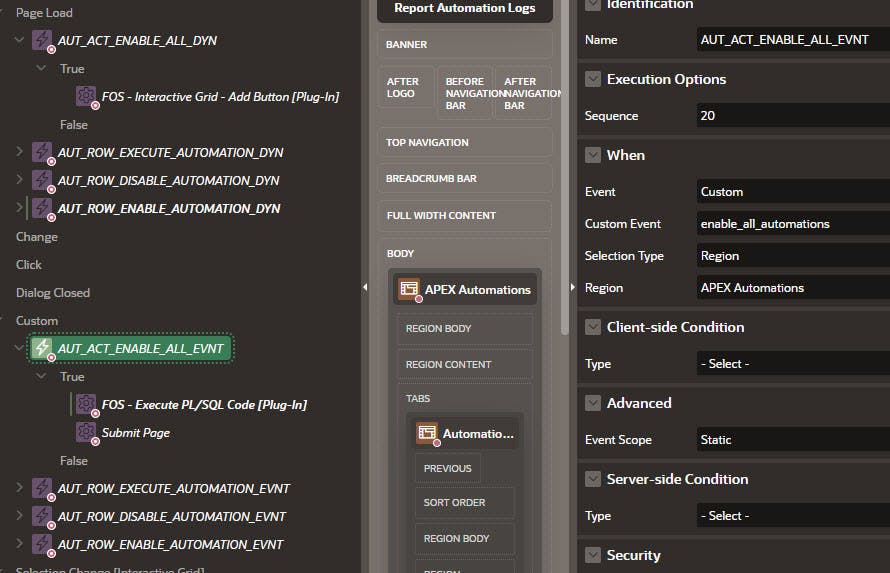
Add a True Action with the FOS Execute PL/SQL Plugin or the standard APEX Execute PL/SQL Action. Below the FOS Execute PL/SQL True Action is shown with appropriate Attributes set, and the PL/SQL code. Set the attributes accordingly. Wrap the PL/SQL code with your error handling and logging code according to your standards.
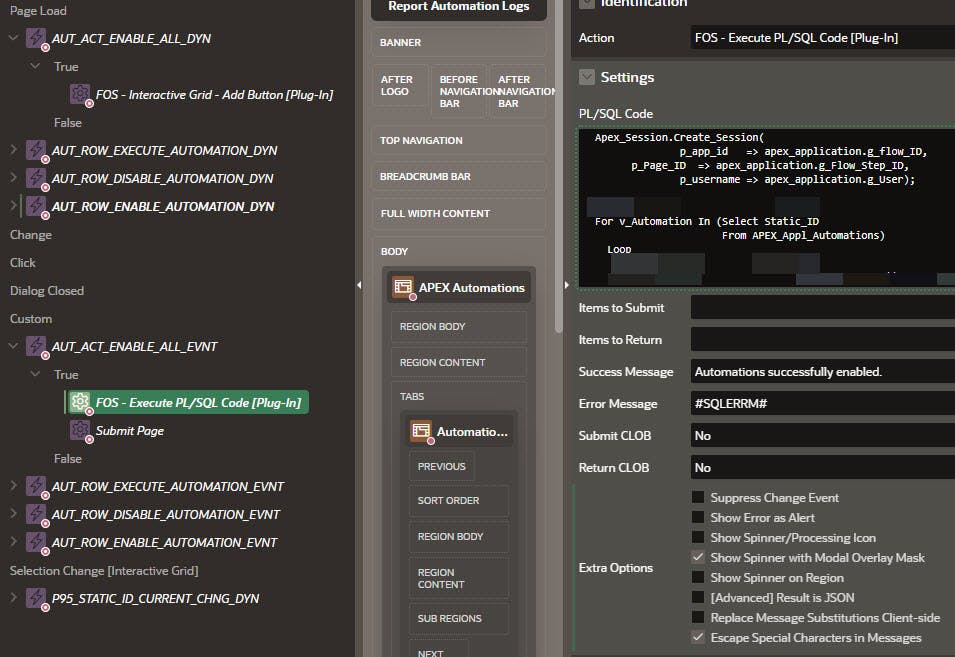
PL/SQL Code:
  Apex_Session.Create_Session(
        p_app_id   => apex_application.g_flow_ID,
        p_Page_ID  => apex_application.g_Flow_Step_ID,
        p_username => apex_application.g_User);

  For v_Automation In (Select Static_ID
                       From APEX_Appl_Automations)
    Loop
      apex_automation.enable(
                             p_Application_ID => apex_application.g_Flow_ID,
                             p_static_Id      => v_Automation.Static_ID);
    End Loop;
Lastly, add a second True Action: Submit Page. The end result is:
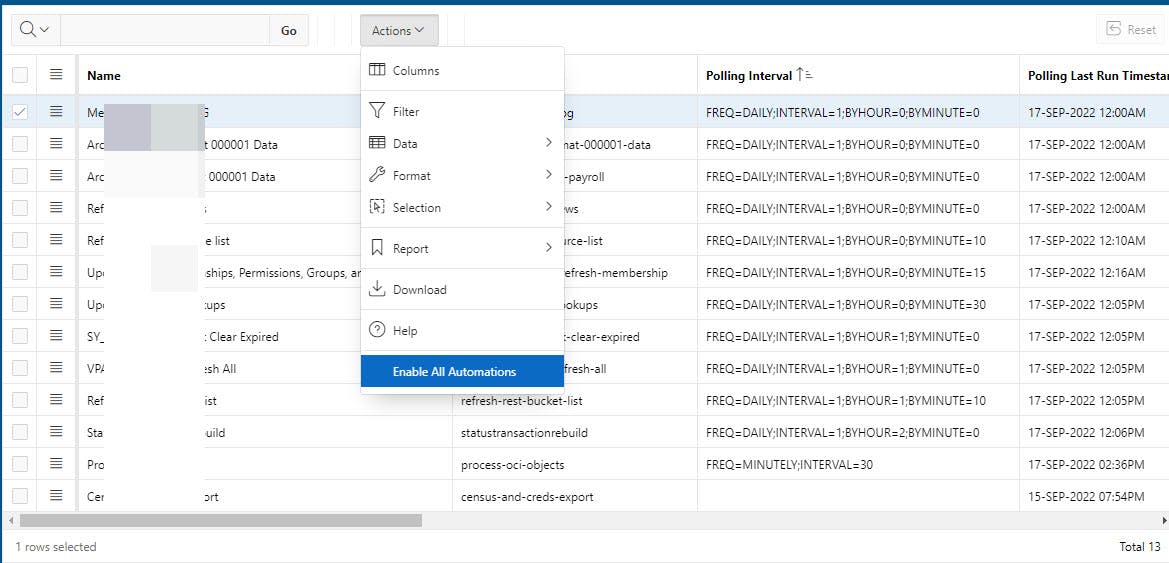
The row menu actions are little more complicated because they need the row primary key value to know which automation to act on. The good news is that updating an item with the Primary Key value is also good functionality to understand. To achieve this a Page Item will be created to contain the current row primary key value that will be updated each time a row is selected.
(Previous instructions for the Automation IG to uncheck "Select First Row" were necessary to require clicking / selecting the first row to set the Primary key value. Otherwise if the first row were chosen right away there would not have been a change and the value would not have been set causing an error when the menu choice was clicked without a primary key value.)
(Note: Alternatively, there is a FOS Plugin for setting the primary key value and then triggering actions when the value is changed instead of using Custom Events as defined below. That would require creating Page Items to hold the currently selected row's primary key value for each menu action envisioned.)
Create a Page Item in the APEX Automations region to contain the current row's primary key value with the Hidden and Value Protected (off) attributes shown below.
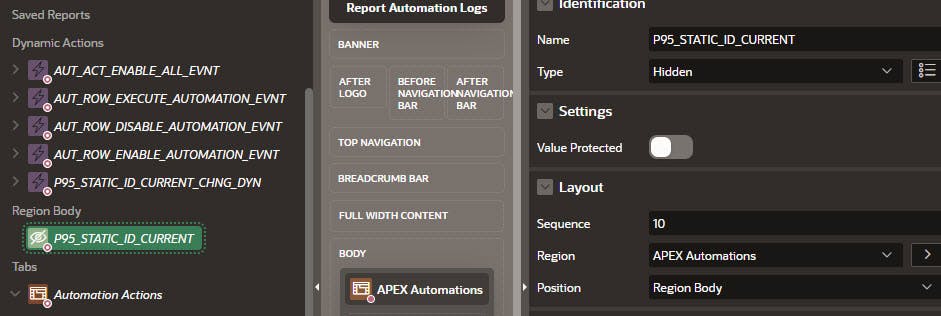
Create a dynamic action in the APEX Automations region triggered by a row selection change as shown below.
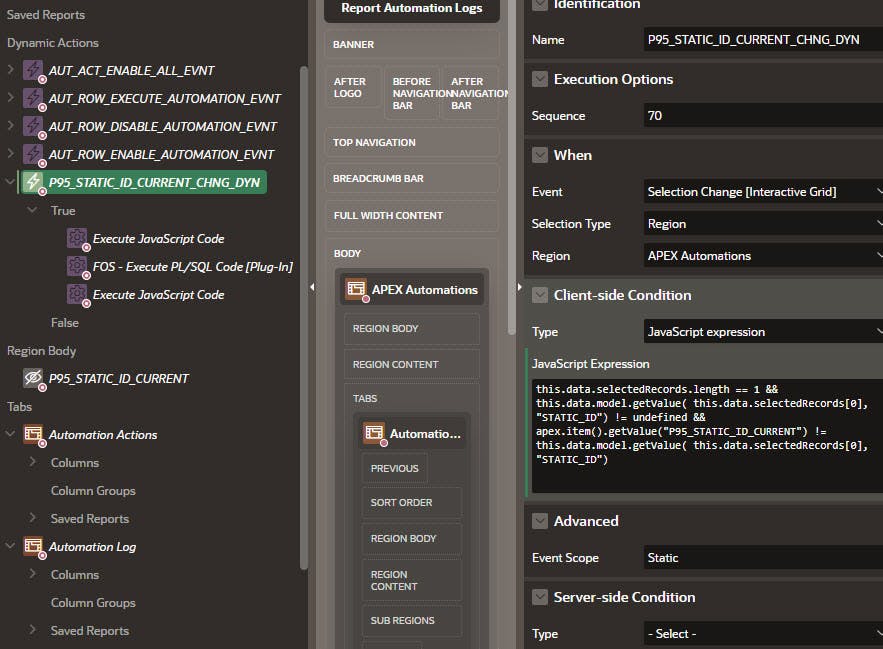
The JavaScript Expression is follows. Be sure the P95_STATIC_ID_CURRENT Page Item reference matches the name used in your application.
this.data.selectedRecords.length == 1 &&
this.data.model.getValue( this.data.selectedRecords[0], "STATIC_ID") != undefined &&
apex.item().getValue("P95_STATIC_ID_CURRENT") != this.data.model.getValue( this.data.selectedRecords[0], "STATIC_ID")
Add a True Action: Execute JavaScript Code as shown below.
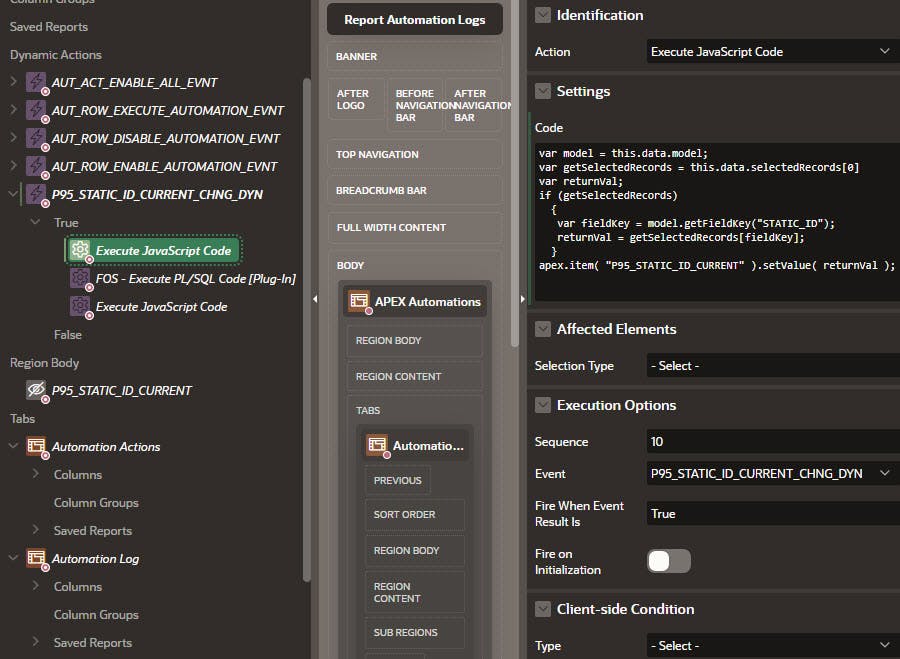
JavaScript Code: (Again, be sure the Page Item name matches the one used in your application)
var model = this.data.model;
var getSelectedRecords = this.data.selectedRecords[0]
var returnVal;

if (getSelectedRecords)
  {
   var fieldKey = model.getFieldKey("STATIC_ID");
   returnVal = getSelectedRecords[fieldKey];
  }
apex.item( "P95_STATIC_ID_CURRENT" ).setValue( returnVal );
Add a True Action: Execute PL/SQL to cause the Page Item's value to be submitted.

After creation of this Dynamic Action each time a different row is selected :P95_STATIC_ID_CURRENT should include the value of the STATIC_ID column. Un-hide :P95_STATIC_ID_CURRENT temporarily and select different rows to check that it is working properly.
Now back to our "Hamburger" row menu actions, Execute, Enable, and Disable Automations, starting with Execute.
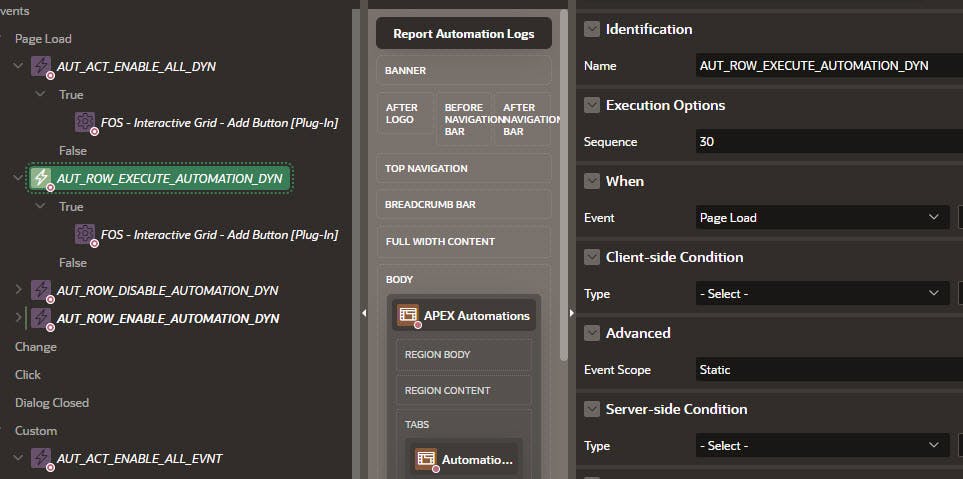
Add a Dynamic Action under Page Load to create the Execute Automation "Hamburger" Row Menu Item.
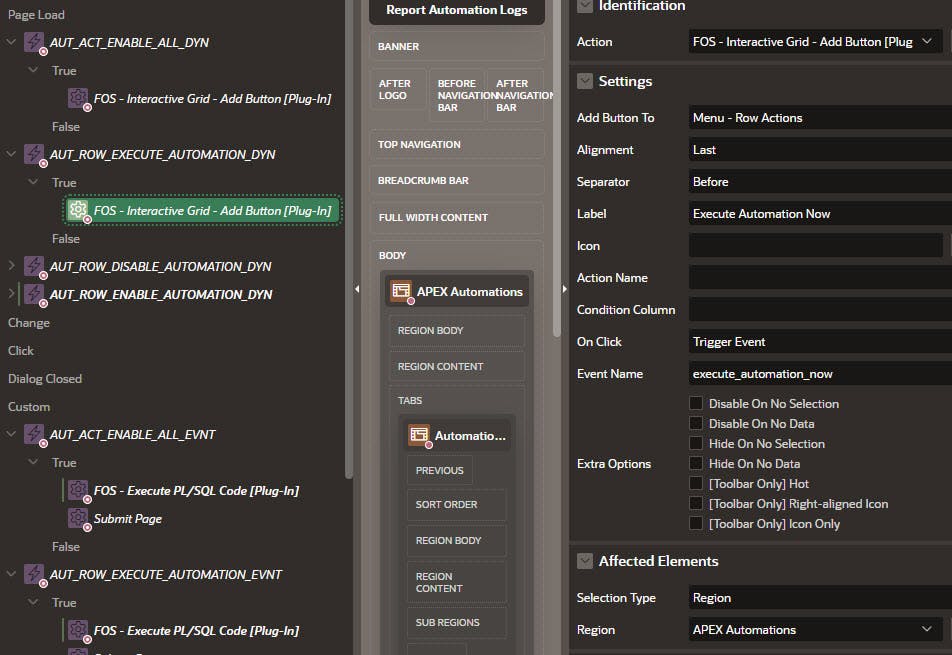
Add a True Action: FOS-Interactive Grid - Add Button [Plug-In] to add the Execute Menu Choice to the Row that will trigger the Custom Event "execute_automation_now".
Add a AUT_ROW_EXECUTE_AUTOMATION_EVNT Dynamic Action in the APEX Automations region triggered by the "execute_automation_now" Custom Event from the AUT_ROW_EXECUTE_AUTOMATION_DYN Menu Dynamic Action as below:
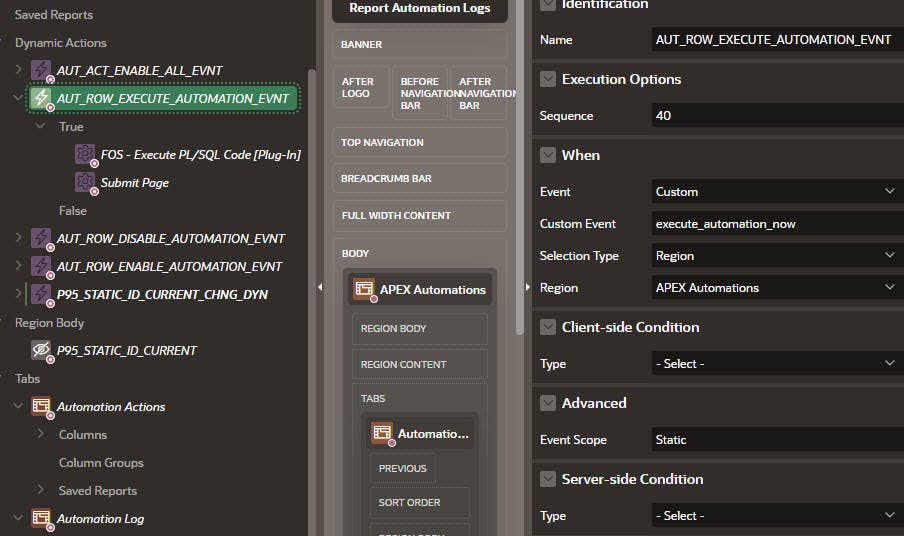
Add a True Action to execute PL/SQL Code as shown:
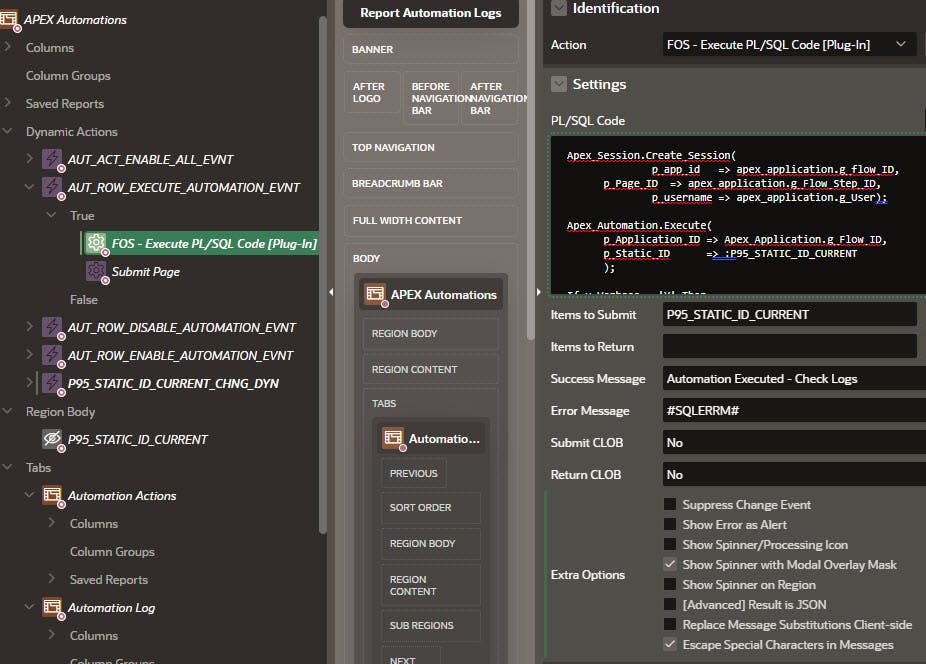
Wrap the PL/SQL Code shown with your error logging and tracking code:
  Apex_Session.Create_Session(
        p_app_id   => apex_application.g_flow_ID,
        p_Page_ID  => apex_application.g_Flow_Step_ID,
        p_username => apex_application.g_User);

  Apex_Automation.Execute(
        p_Application_ID => Apex_Application.g_Flow_ID,
        p_Static_ID      => :P95_STATIC_ID_CURRENT
        );
Lastly, add a True Action as shown above: Submit Page.
At this point the "Execute Automation" row menu item will appear in the "Hamburger" row menu and execute after a row is selected and the menu item is clicked.
Addition of the Disable Automation and Enable Automation menu items is accomplished similarly beginning with the "Now back to our "Hamburger" row menu actions,..." section heading above. Note Dynamic Actions and True Actions (as well as other objects) can be copied by right clicking on the item and choosing "Duplicate", and then modified accordingly.
The differences are:
Page Load Dynamic Action Name: AUT_ROW_EXECUTE_AUTOMATION_DYN (Enable, Disable instead of Execute)
Page Load Dynamic Action, True Action. Menu and Event Names
Event Dynamic Action Name and Custom Event
Event PL/SQL Code:
Disable:
  Apex_Session.Create_Session(
        p_app_id   => apex_application.g_flow_ID,
        p_Page_ID  => apex_application.g_Flow_Step_ID,
        p_username => apex_application.g_User);

  Apex_Automation.Disable(
        p_Application_ID => Apex_Application.g_Flow_ID,
        p_Static_ID      => :P95_STATIC_ID_CURRENT
        );
Enable
  Apex_Session.Create_Session(
        p_app_id   => apex_application.g_flow_ID,
        p_Page_ID  => apex_application.g_Flow_Step_ID,
        p_username => apex_application.g_User);

  Apex_Automation.Enable(
        p_Application_ID => Apex_Application.g_Flow_ID,
        p_Static_ID      => :P95_STATIC_ID_CURRENT
        );
The last step is to add IG detail tabs showing Automation Actions and Log entries related to the currently selected IG Master selected row.
Following is an example using the "Process_OCI_Objects" automation showing related Automation Actions, Automation Log entries, and Action Messages associated with the Log entries if applicable, typically entries with a Status of Failure.
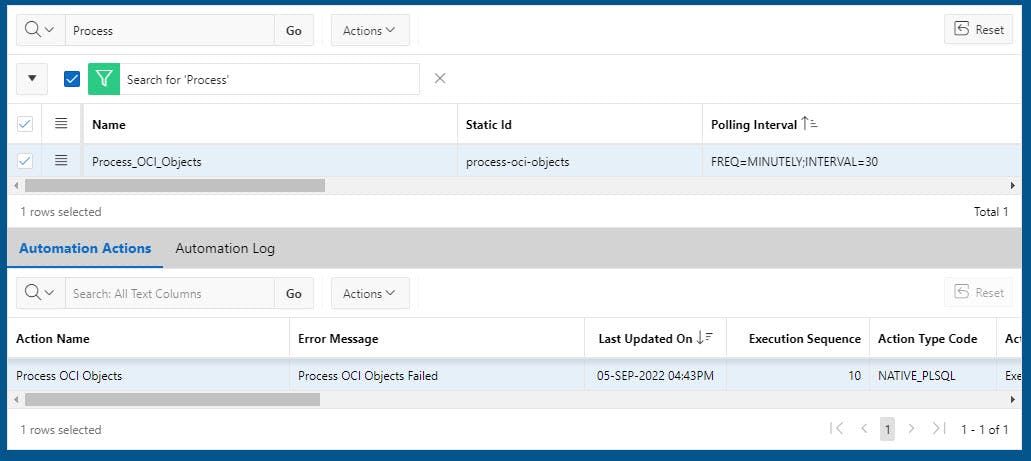 The Source query for Automation Actions is:
Select *
From APEX_APPL_Automation_Actions;
The Master IG is APEX_Appl_Automations with a Master Detail Column of APEX_APPL_Automation_Actions.Automation_ID. There are numerous columns, most of which I unselected in the IG Actions drop down menu "Columns" choice.
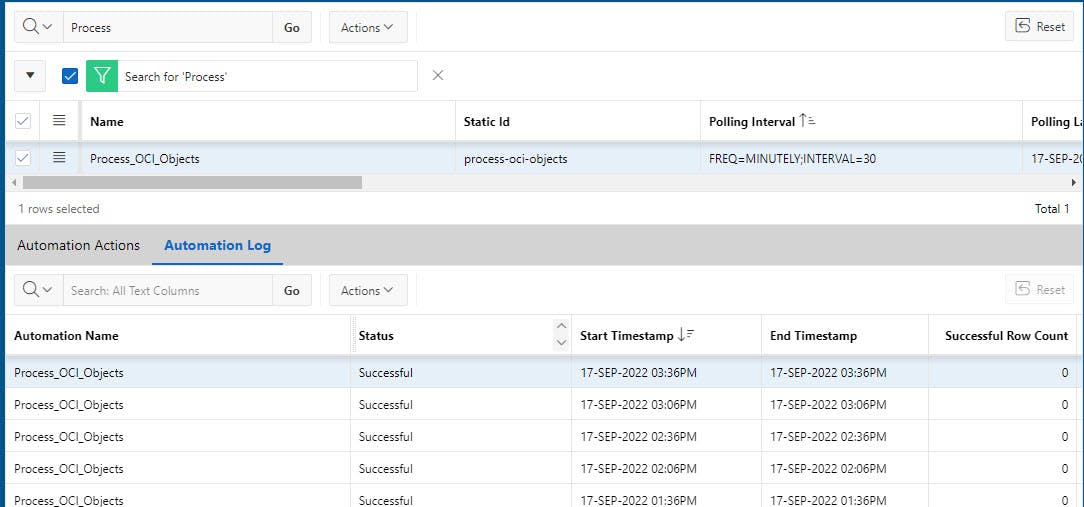
The Source query for Automation Log is:
Select *
From APEX_Automation_Log;
The Master IG is APEX_Appl_Automations with a Master Detail Column of APEX_Automation_Log.Automations_ID. There are numerous columns, most of which were unselected in the IG Actions drop down menu "Columns" choice.
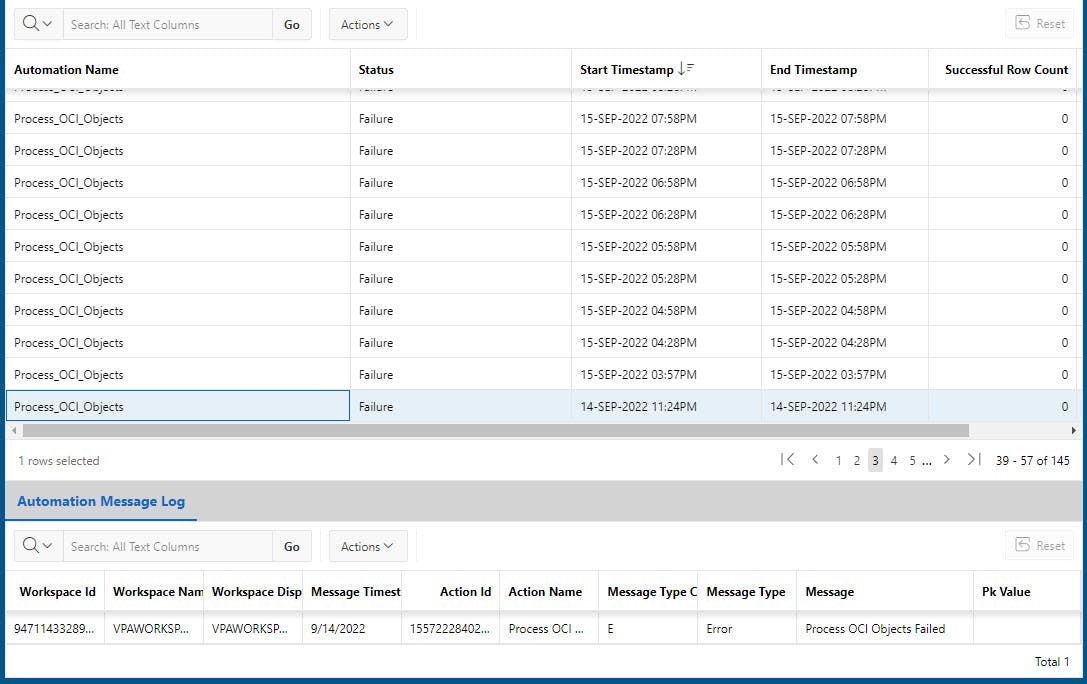
The Source query for the Automation Message Log is:
Select *
from APEX_Automation_Msg_Log
The Master IG is APEX_Application_Log with a Master Detail Column of APEX_Application_Log.Application_ID. There are numerous columns, most of which were unselected in the IG Actions drop down menu "Columns" choice.
In summary, the APEX Application Automation management page described in this Blog facilitates APEX Automation job viewing, execution, enablement, and disablement individually, as well as enablement of all jobs as a whole in one unified user interface. The functionality provides an alternative to APEX Builder Shared Components for enabling all jobs after the application has been imported.
I hope you found this Blog useful and welcome your comments.

